Category Archives: Labs

[Pre] Eight Keyboard Shortcuts For WebOS

1. Soft Reboot

  • Hold these keys at once Orange Key + Sym Key + R

2. Make Screenshot

  • Hold these keys at once Orange Key + Sym Key + P

3. Num Lock

  • double click Orange Key

4. Caps Lock

  • double click Shift Key

5. Highlight Text

  • Hold Shift Key and mark text on screen
  • Highlighted text becomes yellow backgrounded

6. Copy Text to Clipboard

  • Highlight text as described above
  • Hold finger to the gesture area (right or left of the middle button)
  • The middle button begins to glow
  • Press C Keyon keyboard to copy

7. Cut Text to Clipboard

  • Highlight text as described above
  • Hold finger to the gesture area (right or left of the middle button)
  • The middle button begins to glow
  • Press X Key on keyboard to cut

8. Paste Text from Clipboard

  • put cursor to the place where you want text pasted
  • Hold finger to the gesture area (right or left of the middle button)
  • The middle button begins to glow
  • Press V Key on keyboard to paste

[Pre] Recommended Apps: Reboot Scheduler

Many of us know the phenomenon. The longer we use the iPhone or the Palm Pre the slower it goes. Rebooting the system always helped on either device.

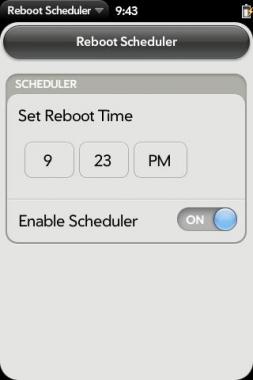
For the Palm Pre there is now a solution that is called Reboot Scheduler by Zinge, which allows to automize the reboot process and to schedule it to a certain time.

We feel this is a nice tool for people running homebrew apps on their Pre anyway. You find it via the PreCentral repository.

That’s what we really like about the Palm Pre WebOS platform: it embraces the homebrew developers. No jailbreaking, no hassle.

Kudos fly out to Zinge and the PreCentral team.

Links

» PreCentral.net: Palm Pre Reboot Scheduler

Screenshot is courtesy of PreCentral.net

[PS3] GeoHot Opens All HV’s SPUs / XorLoser Preps Manual

Obviously notorious George Hotz has managed to get all 7 SPUs of the Playstation 3’s CPU under his control. This means although he cannot access the CPU’s root key, he now can decrypt everything that’s going thru these SPUs like datastreams of (encrypted) commercial games.

The PPU is higher on the control chain then the SPUs. Even if checks were to be added to, for example, verify the hypervisor before decrypting the kernel, with clever memory mappings you can hide your modified hypervisor.

In the meantime another hacker going under the nick XorLoser has released a more detailed manual of how to use GeoHot’s exploitation files and how to do the glitching.

Besides that XorLoser maintains a plugin for reverser’s beloved Interactive Disassembler (IDA) that contains special PPC instructions for Xbox360 and PS3.

Congratulations to GeoHot. Kudos fly out to XorLoser.

Links

» GeoHot: On Isolated SPUs
» XorLoser: PS3 Exploit – Software
» XorLoser: PS3 Exploit – Hardware
» XorLoser: PS3 and Xbox360 IDA PlugIn
» Hex-Rays.com: IDA Pro

[Security] Tarnovsky Explains Infineon TPM Hack

On the Black Hat 2010 conference in Crystal City notorious smart card hacker Christopher Tarnovsky explained how he managed to hack current Trusted Platform Modules by Infineon.

This time Tarnovsky managed to read secured data from TPM chips like RSA and DES crypto keys. His approach took six months and a lab consisting of devices for about US$ 200,000. After having found out the exacty way to compromise Infineon’s chips it took only six hours to compromise an XBox 360’s TPM chip.

On the Black Hat 2008 in Amsterdam Tarnovsky said he was offered US$ 100,000 to crack the Xbox 360’s TPM:

A Microsoft engineer is wondering: “Did you take an interest in the processor of our Xbox360 game console?” – “I was offered 100’000 dollars to break it”, says Tarnovsky. “But I replied that that wasn’t enough.”

For people generally interested in approaching smart card security check this article with a video Wired.com featuring Tarnovsky in his security lab.

[Security] Credit Card Authorization Compromised

Security experts from the Computer Laboratory of the University of Cambridge have compromised the electronic autorization and verification process of major credit and debit cards like EC-Card, Eurocard, Mastercard and VISA (EMV).

The computer scientists team around Steven Murdoch found a flaw in the in the EMV protocol which allows criminals to use a stolen genuine card to make a payment without knowing the card’s PIN.

Using a man-in-the-middle attack they trick the electronic terminal into believing the PIN was verified correctly while telling the terminal to step back into signature based authorization mode.

This being said, credit card companies and banks worldwide will not be able to hide behind the phrase that their systems are secure and that customers who have been stolen credit cards have not observed the rule to destroy their credit card’s PIN. Insurance companies take care: customers recurse receivables against issueing banks are coming.

Links:
» IEEE Symposium on Security and Privacy: Chip and PIN is Broken (PDF)
» BBC.co.uk: New flaws in chip and PIN system revealed
» University of Cambridge: Computer Laboratory

Documentary is courtesy of BBC.co.uk

[Pre] Palm Pre’s Slider Oreo Issues

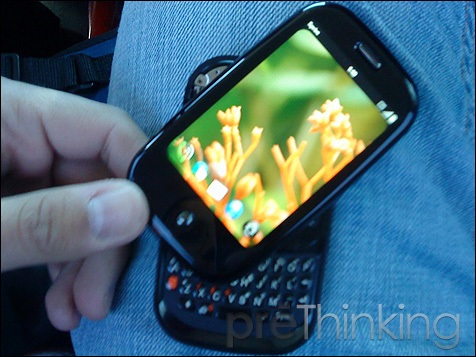
Forum reports seem to be growing about this issue. A certain amount of first generation Palm Pre’s being sold all over the world seem to have slider issues. “It just wobbles too much, thus making it feel like a 500€ plastic toy.”, said a customer in a local O2 store.

Our testing device received from  a local O2 store in November, 2009 here in Berlin suffers the same slider issue.

When talking to O2’s customer support,  he by the way confirmed: “my Pre had the same issue. It is being repaired currently.”

Fortunately the repairing procedure with O2 is quite painless. If a customer realizes a defect within the first seven days of purchase, the local O2 store offers direct exchange of the device (this not only applies to Palm’s devices but to any cell phone O2 offers here in Germany). If defects are reported after seven days, they will be repaired within two weeks. Business customers are offered exchange devices at any time within 48hours.

If Palm Pre’s having the orea offect can be repaired at all, is still not really proven. According to a report on PreThinking, U.S. american devices are getting exchanged. Repair centers are not allowed to repair them.

When asking O2’s customer service, if the slider issue has been reported often, he answered: “No, this is a very rare issue, and we also asked Palm about this, and they also said, there is no slider issue.”

This might be the case for Germany, but in the meantime Palm in the U.S.A. seem to have implicitly confirmed the slider issues. In a PreCentral.net review article of the second generation Palm Pre (called Palm Pre Plus for the Verizon network), Dieter Bohn mentioned that “Palm says that they’ve fixed up the slider action (..)”.

In the meantime we’ve received our exchange device, and guess what? Although it still is a first generation Palm Pre, this slider has no orea effect.

It feels a lot more stable, making it eventually a serious tool for all the people who don’t want to follow the iPhone hype.

Picture is courtesy of PreThinking.com

[Pre] Enable Developer Mode

Enabling the Developer Mode gives access to a thousand of homebrew apps and apps which are currently under beta testing.

There are now two ways known to enable the Pre’s dev mode.

1. Simply enter the Konami cheat code:

upupdowndownleftrightleftrightbastart

2. or enter this:

webos20090606

in either way, you’ll see a “secret” menu switch that allows you to enable the developer mode. After that reboot the device.

[Pre] webOS 1.3.5, webOS 1.3.5.1 and the CES 2010

European customers are still waiting for webOS 1.3.5 update. The European carrier Telefonica (o2 and MoviStar)  seems not to have approved it yet.

Meanwhile it seems versions 1.3.5 had issues. According to PreCentral.net, Palm Pre customers on Sprint (USA) and Bell (Canada) are able to update to version 1.3.5.1 since Januar 5th, 2010. Version 1.3.5 has been released in the US and Canada on December 29th, 2009.

Issues with homebrew apps on 1.3.5 and 1.3.5.1

It is known, that webOS 1.3.5 breaks homebrew installer PreWare. Known workaround is using WebOS Quick Install to remove and then reinstall PreWare. It should be working well again.

There are also issues with homebrew apps that don’t contain  an appinfo.json file. Apps not properly prepared would not be getting moved from /var to /media/cryptofs/apps. Package Manager Service 0.9.24.3 has fixes for this problem.

And the latest 1.3.5.1 also breaks myTether. This seems not resolved yet.

Amazing news

In the meantime people from the WebOS Internal forums have discovered, that webOS 1.3.5 includes Simple DirectMedia Layer (SDL). SDL allows hardware accelerated graphics and sound and is available on different platforms for free and open source. Via homebrew installer PreWare a playable alpha version of Doom using SDL has already been released.

Europeans still waiting

Although Palm is said to be unveiling something big on the CES 2010 tomorrow, we don’t expect Telefonica to approve 1.3.5 until then for Europe.

It is rumored, on the CES Verizon Wireless will be officially named the new partner for a device called Palm Pre Plus (Palm Pre 3).

Links

» PreCentral: webOS 1.3.5.1 Available for OTA Download
» PreCentral: webOS 1.3.5.1 goes live for Pre users on Bell
» PreCentral Forums: Status of Preware and 1.3.5
» PreCentral Forums: Preware + mytether unavailable after 1.3.5.1
» WebOS Internals Wiki: Doom on Palm Pre
» Wikipedia: Simple DirectMedia Layer (SDL)…
» WebOS Blog: Was kommt zur CES 2010 von Palm? (Google translated link)…
» PhoneArea: Verizon to get Palm Pre Plus

Video

[MacOS] Add Avi Files to iTunes Library

I. Abstract

As some of us have already realized: iTunes by default does not allow adding AVI files to its library. This is very sad, but there are several solutions for this problem.

II. Converting or going Commercial?

One might be converting all files to something that QuickTime allows to play. As this is not a convenient solution for people having a lot of AVI files, we might give Aroona’s VideoDrive app a try. VideoDrive allows adding AVI files to the iTunes library with a simple click. This is nice. But it costs 15€.

III. Using a freeware Apple script

But you might also try a custom script for free. Since as long as QuickTime can play your file, iTunes is also able to do so. And you know it: QuickTime on the Mac plays AVI, XviD, DivX, x264 movie files and a whole bunch of interesting codecs just beautifully using Perian.

Anyway the solution provided here has originally been publicly released by a guy going under the nick Nevyn on the MacRumors Forums. Aroona’s VideoDrive appeared much later on the markets. By the way: Arroona’s VideoDrive also uses Apple scripts for their things… so yes, the universe is full of funny coincidences.

Nevyn’s script does a simple thing. It adds the movie-type meta-data to the AVI file. And this basically could also be done via terminal:

  • testuser$ SetFile -t "MooV" /path/to/movie.avi

But the nice thing is Nevyn put this idea in tiny Apple Script, that allows creating a nice Apple Script Droplet. Thus allowing us to just drop the files or folders on the Droplet and have the AVI files instantly available in iTunes’ movie library – ready for sharing on the local net via Bonjour…

As said this script has originally been released on the MacRumors Forums:

(*add movie to iTunes

The script will add OSList file-type information to a list of files. This identifies them as movie files, the files are then imported into iTunes.

TO DO:
Verification of file list passed as video files
Growl integration (if installed)
Move repeat loop into separate object script to clean-up code.
*)

--Folder Action [Attach to a folder in Finder]
on adding folder items to this_folder after receiving file_list
repeat with each_file in file_list
try
tell application "Finder" to set file type of file each_file to "MooV"
end try
end repeat
tell application "iTunes" to add file_list
end adding folder items to

--Droplet [Compile and drop items onto application]
on open file_list
repeat with each_file in file_list
try
tell application "Finder" to set file type of file each_file to "MooV"
end try
end repeat
tell application "iTunes" to add file_list
end open

Yes this is basically it. In case you are too lazy to copy and paste. You’ll find the script already put into a Droplet ready for download here. Shouts to Navyn. Nice script…

Enjoy and yes: happy new year to all of you :-)

Links

»MacRumors Forums: Add AVI to iTunes
»Aroona.net: VideoDrive Download
»MegaUpload: Download AVI to iTunes Droplet for free ;-)…
»Perian.org: Download Perian for QuickTime

[MacOS] Chameleon On USB: Mounting USB Stick Correctly

Inserting USB sticks to your Mac OS X based system makes Mac OS X mount the stick without assigning certain permissions like owners, or groups.

I. How things get mounted on Mac OS

The mount command on the terminal returns most likely some lines, like that:

  • testuser$ mount
  • /dev/disk0s2 on / (hfs, local, journaled)
    devfs on /dev (devfs, local, nobrowse)
    map -hosts on /net (autofs, nosuid, automounted, nobrowse)
    map auto_home on /home (autofs, automounted, nobrowse)
    /dev/disk3s1 on /Volumes/CHAMBOOT (hfs, local, nodev, nosuid, journaled, noowners)
    /dev/disk1s4 on /Volumes/Mac OS X Install DVD (hfs, local, nodev, nosuid, noowners)

You can see quite a lot of slices (i.e. ~partitions) are mounted to that system I am running here. For instance disk1s4 is the forth slice of disk1 and it countains an image of a Mac OS X Install DVD. And you can see a CHAMBOOT named drive mounted with several options.

II. Mount Options/Permissions

Our beloved USB stick named CHAMBOOT (contains Chameleon and) is disk3s1 and is mounted to /Volumes/CHAMBOOT. Mac OS handles USB mounting for most of our every day life operations fairly reliable. But this comes at a cost, as this simplicity is achieved here by applying options like nosuid and noowners during the mount process.

For people willing to run Chameleon from a USB stick permissions are inevitable, as for instance an Extensions.mkext kextcache can only be generated with proper file permissions being set.

II. Mounting USB with permissions

This just requires some simple mount operations being performed manually on the terminal. Do the following:

  • testuser$ sudo -s
    Become ultimate root now.
  • testuser$ cd
    Get back to the home folder whereever you’ve been before.
  • testuser$ sync
    Force completion of pending disk writes.
  • testuser$ umount -f /Volumes/CHAMBOOT
    This unmounts the USB stick called CHAMBOOT
  • testuser$ mkdir chamboottemp
    Create a temporary folder for our mounting session
  • testuser$ mount_hfs /dev/disk3s1 chamboottemp/
    Mount the USB stick to the temporary folder
  • testuser$ mount
    See how the drives are mounted now
  • /dev/disk0s2 on / (hfs, local, journaled)
    devfs on /dev (devfs, local, nobrowse)
    map -hosts on /net (autofs, nosuid, automounted, nobrowse)
    map auto_home on /home (autofs, automounted, nobrowse)
    /dev/disk3s1 on /Users/admin/chamboottemp (hfs, local, journaled)
    /dev/disk1s4 on /Volumes/Mac OS X Install DVD (hfs, local, nodev, nosuid, noowners)
    You can see the USB stick is now mounted without “extra” options.

Now you can apply changes to the USB stick’s files in the proper manner (like copying files, repairing permissions and creating a kextcache). After having performed all the changes, you can correctly unmount. Read here:

III. Manually Unmounting

  • testuser$ cd
    Get back to the home folder whereever you’ve been before.
  • testuser$ umount -f chamboottemp
    Force to unmount the device mounted to the chamboottemp folder now.
  • testuser$ rmdir chamboottemp
    It is safe to delete the chamboottemp folder now.

IV. Links

» Mac OS X Reference Library: Man Page for “sync”
» Mac OS X Reference Library: Man Page for “mount”
» AsereBln.BlogSpot.com: Some terminal work