Tag Archives: Sync

[MacOS] Chameleon On USB: Mounting USB Stick Correctly

Inserting USB sticks to your Mac OS X based system makes Mac OS X mount the stick without assigning certain permissions like owners, or groups.

I. How things get mounted on Mac OS

The mount command on the terminal returns most likely some lines, like that:

  • testuser$ mount
  • /dev/disk0s2 on / (hfs, local, journaled)
    devfs on /dev (devfs, local, nobrowse)
    map -hosts on /net (autofs, nosuid, automounted, nobrowse)
    map auto_home on /home (autofs, automounted, nobrowse)
    /dev/disk3s1 on /Volumes/CHAMBOOT (hfs, local, nodev, nosuid, journaled, noowners)
    /dev/disk1s4 on /Volumes/Mac OS X Install DVD (hfs, local, nodev, nosuid, noowners)

You can see quite a lot of slices (i.e. ~partitions) are mounted to that system I am running here. For instance disk1s4 is the forth slice of disk1 and it countains an image of a Mac OS X Install DVD. And you can see a CHAMBOOT named drive mounted with several options.

II. Mount Options/Permissions

Our beloved USB stick named CHAMBOOT (contains Chameleon and) is disk3s1 and is mounted to /Volumes/CHAMBOOT. Mac OS handles USB mounting for most of our every day life operations fairly reliable. But this comes at a cost, as this simplicity is achieved here by applying options like nosuid and noowners during the mount process.

For people willing to run Chameleon from a USB stick permissions are inevitable, as for instance an Extensions.mkext kextcache can only be generated with proper file permissions being set.

II. Mounting USB with permissions

This just requires some simple mount operations being performed manually on the terminal. Do the following:

  • testuser$ sudo -s
    Become ultimate root now.
  • testuser$ cd
    Get back to the home folder whereever you’ve been before.
  • testuser$ sync
    Force completion of pending disk writes.
  • testuser$ umount -f /Volumes/CHAMBOOT
    This unmounts the USB stick called CHAMBOOT
  • testuser$ mkdir chamboottemp
    Create a temporary folder for our mounting session
  • testuser$ mount_hfs /dev/disk3s1 chamboottemp/
    Mount the USB stick to the temporary folder
  • testuser$ mount
    See how the drives are mounted now
  • /dev/disk0s2 on / (hfs, local, journaled)
    devfs on /dev (devfs, local, nobrowse)
    map -hosts on /net (autofs, nosuid, automounted, nobrowse)
    map auto_home on /home (autofs, automounted, nobrowse)
    /dev/disk3s1 on /Users/admin/chamboottemp (hfs, local, journaled)
    /dev/disk1s4 on /Volumes/Mac OS X Install DVD (hfs, local, nodev, nosuid, noowners)
    You can see the USB stick is now mounted without “extra” options.

Now you can apply changes to the USB stick’s files in the proper manner (like copying files, repairing permissions and creating a kextcache). After having performed all the changes, you can correctly unmount. Read here:

III. Manually Unmounting

  • testuser$ cd
    Get back to the home folder whereever you’ve been before.
  • testuser$ umount -f chamboottemp
    Force to unmount the device mounted to the chamboottemp folder now.
  • testuser$ rmdir chamboottemp
    It is safe to delete the chamboottemp folder now.

IV. Links

» Mac OS X Reference Library: Man Page for “sync”
» Mac OS X Reference Library: Man Page for “mount”
» AsereBln.BlogSpot.com: Some terminal work

[Pre] Update 1.3.1 for GSM to be Released Nov 23, 2009 ?

According to a posting to the german Nexave forums the european Palm Pre 1.3.1 update (for GSM phones) will be released on monday November 23, 2009. The update does not seem to include activation of the GPU.

We recommend to remove custom installed homebrew patches.

Features:

  • Synergy: – Calendar and Contacts synchronization with Yahoo!
  • LinkedIn contacts synchronization
  • Synchronizes Google Contacts “My Contacts” (not all)
  • Manual edit of Internet settings (APN, user name, password, etc.)
  • Option to disable all data connections
  • Bluetooth support to send / receive vCards
  • Backup and restore:
  • No backup of passwords for increased security
  • Disabling of backup service works
  • Backup Browser Favorites
  • iTunes support from version 9.x
  • Available space is immediately updated and displayed when in USB mass storage mode data is added or removed
  • Manual e-mail retrieval works
  • SMS / MMS forwarding, and marking of all communications
  • Highlight / copy of selected areas of SMS and IM messages
  • Browser: File download in browser
  • Highlight / copy of text in the browser
  • Support for Self-Signed Certificates
  • System volume was optimized
  • Optimization of the audible during an incoming call when another call is active
  • AppCatalog: Recommendation for Apps can be forwared via email or SMS
  • Facebook Application
  • Country-Specific Application Offers
  • Initial Registration: password input is now a part of the recovery (because passwords will no longer be backed up) and now entering a security question and answer in the account creation is mandatory. SIM card PIN is requested during the registration process.

via Nexave.de Forums…

[Pre] Marry me again: WebOS 1.2.1 syncs to iTunes 9.01

A couple of days after their latest release of WebOS 1.2 Palm released WebOS 1.2.1. Now the Palm Pre is again synchronizing with Apple’s iTunes 9.0.1. Since iTunes version 8.2.1 with every update Apple is trying to stop Palm from syncing their Pre with iTunes. As we’ve seen in the past, all those attempts by Apple don’t last long. According to Precentral.net the Palm Pre uses Apple’s USB idVendor string to fool iTunes into thinking the Palm Pre is an iPod.

The WebOS 1.2.1 update features:

  • sync photo albums with iTunes
  • reducing size of photos on the Pre
  • bugfix for Microsoft Exchange Server 2007 sync

The update is 38MBybte in size and will be transmitted automatically on the Pre – at least in the USA.

[Pre] Merry Me again: Update Reunites Palm Pre with iTunes

The “little Palm Apple battle” goes into its next round. A week ago Apple released iTunes 8.2.1. This update blocked Palm Pre users from synchronizing music and movies with iTunes. We reported about this update and the technical implications of the sync feature here.

Palm has now released a firmware update (webOS 1.1.0) for the Palm Pre. According to Palm’s blog entry this update contains the following features:

  • Exchange ActiveSync (EAS) (including remote wipe, PIN/password requirements, inactivity timeout, improved certificate handling and more)
  • support for emoticons in the messaging app
  • person reminders (“Next time you get a message or phone call from that person, a message pops up showing you a reminder to ask them about their vacation in Maui” ct. Palmblog)
  • and Palm webOS 1.1 re-enables Palm media sync with music, photos and videos with the current version of iTunes (8.2.1).

Got issues with the Update?

Our fellow Heise.de News (german only) recommend not to update your Palm Pre while it is connected to iTunes. In case you did that and your Palm Pre does not interact on USB anymore, do a hard reset with unplugging the battery.

[News] Apple Bar Palm Pre from Syncing with iTunes

With the latest update of iTunes 8.2.1 Apple eventually blocks Palm Pre users from syncing with iTunes. It seems Palm knew very carefully how to emulate the iPod verification protocol of iTunes. How comes?

Some major Palm Guys are former major Apple Guys

One could ask Palm’s CEO Jon Rubinstein, or Palm’s SVP of Product Development Mike Bell, or Palm’s spokeswoman Lynn Fox. As all of these three guys are former Apple guys. Rubinstein was Apple’s architect of the iTunes-iPod concept, Mike Bell was the Vice President of the Mac Hardware Division, and Lynn Fox was Head of PR at Apple.

Anyway Apple now decided to fix this issue and bar Palm Pre users from using iTunes for syncing. But what looks like a simple update in the first place may be viewed as a strategic answer to Palm’s boldness to make the Pre pretend being an iPod for iTunes.

Some Technical Aspects

According to DVD Jon the iPod emulation was not too complicated. Palm needed to emulate

  • the USB interface so that it responds with Apple’s Vendor ID and an iPod Product ID
  • the structure of an iPod filesystem
  • some XML info about the iPod device using a custom Apple USB command

But the the root USB node (IOUSBDevice) still identified the emulated iPod as a Palm Pre (find more details here).

David vs. Goliath

Does Apple fear Palm here? It seems like Palm is putting Apple under some pressure here. The Palm Pre is widely considered as the only real iPhone competitor and allowing it to sync with iTunes would make it more favourable for users who don’t like the proprietory iPhone concept. On the other hand Apple’s step to block it from iTunes again makes the iPhone and iPods the only choice for iTunes users. Anyway it shows obviously that a little fight is going on between Apple and Palm. This topic is under hot discussion on the PreCentral site.

Palm’s spokeswoman Lynn Fox just responded to Apple’s step “Palm’s media sync works with iTunes 8.2. If Apple chooses to disable media sync in iTunes, it will be a direct blow to their users who will be deprived of a seamless synchronization experience. However, people will have options. They can stay with the iTunes version that works to sync their music on their Pre, they can transfer the music via USB, and there are other third-party applications we can consider.”

[Pre] Palm Pre to Sync with iTunes

In the beginning there were only rumors, now it’s a fact. The upcoming iPhone competitor “Palm Pre” will allow seamingless integration into iTunes. Thus making synchronization between photos, DRM free music and contacts almost hassle free.

Moreover the “Palm Pre” will be organized as a mass storage device. Which means you can also just copy and paste your data to the Pre from the device tree in Windows’ “Explorer” or the Mac’s “Finder”.

The Palm Pre will be released on June 6th, 2009 in the U.S. of A. Sadly, there is still no release date available for Europe.

This video is courtesy of AllThingsD by the Wall Street Journal:

[e-Biz] Issues with MobileMe again and again and again and…

MobileMe is this month’ Apple’s never ending story of issues. At first it was only minor problem: customers from Germany and France could not cancel their plans. But then too many eMails got lost and Apple needed about 10 days to fix this issue. Then silently the highly advertised Push-Feature got deactivated (see our report here). In contrast to Apple’s high quality when it comes to usability and features, MobileMe began to leave an impression like a not well tested software in beta stadium.

In the end Apple did the right thing and apologized by offering one month free of charge. All customers thought all of MobileMe’s issues are solved. But sadly they were wrong.

Now MobileMe got again issues. This time syncing of addresses and appointments with mobile devices did not and in some cases still does not work properly. But as Apple said, this problem is also solved now. In certain cases data may not be synced back to the mobile devices. In those cases customers need to activate syncing manually. Read here how to do it. Take a deep breath and be patient, re-syncing may take up to 15 minutes.

[MacOS] Integrate Mac Address Book into Thunderbird

I. Abstract

Mozilla Thunderbird 3 alpha has been released on May 13th. It’s got a wonderful (terrible) working title: “Shredder Alpha 1”. Anyway, there are two features that we Mac users definitly appreciate to read:

  • Thunderbird’s address book is now compatible with OS X’s system Address Book.
  • Thunderbird now is a native Cocoa application…

Well to be serious, we don’t really care if it is a native Cocoa app or whatever app it is, if it is running stable in the end. But we do care about the address book integration. For all iPhone users this is really good news. We never had the chance to use Thunderbird and have the email addresses synchronized with our beloved iPhone.

But there are disadvantages at this very moment. First being the integration. Integration of the address book is a one way street only. Currently we can only synchronize our iPhone with our Mac and have the addresses, phone numbers and mail addresses available in Thunderbird. But you still won’t be able to add new contacts, phone numbers or email addresses to your OS X Address Book using Thunderbird. Thunderbird 3 alpha has read access only. To change entries you need to use the OS X Address Book application. Second disadvantage is, the address book integration has been disabled by default, simply because this compatibility module is under heavy development. In this article we’re gonna show you how to enable it in simple steps.

As note: although we didn’t experience any problems while testing during the last week, we have to point out that this is an alpha release that is not intended for productivity use.

II. Requirements

  • Intel Mac or Intel Hackintosh (Power PC has not been tested, sorry)
  • Download and install Thunderbird 3 alpha (Shredder alpha 1) here.

III. Thunderbird’s Config Editor

We assume you already have Thunderbird 3 alpha installed. Follow these steps:

  • start Thunderbird
  • open Preferences menu
  • click the Advanced menu
  • in tab General you will find the Config Editor... button – click it

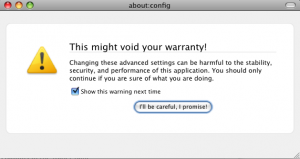
You will see a picture similar like that:

Since you know what you are doing, otherwise you would not be here reading this article, just click the “I'll be careful, I promise” button.

IV. How to add new values

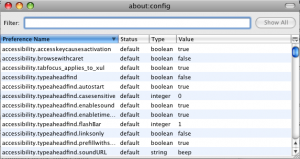
After having promised that you won’t destroy your own system, you will see a new window, which is titled “about: config“. The window will look similar like this:

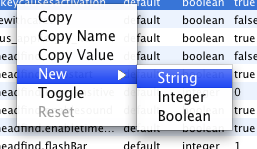
Some more instructions here: with a click on the right mouse button (or ctrl+left mouse button!) you open the context menu in the Config Editor.

V. Add the description tag

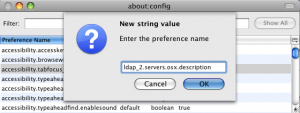
As shown add a New > String value. You will be asked to Enter the preference name, then. Enter this:

  • ldap_2.servers.osx.description
  • click on OK

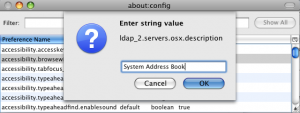
After clicking OK a new box will ask you to Enter the string value. Enter this:

  • System Address Book
  • click on OK

VI. Add the dirtype tag

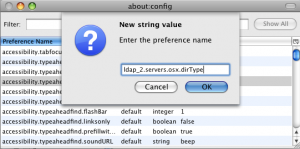
As shown add a New > String value. You will be asked to Enter the preference name, then. Enter this:

  • ldap_2.servers.osx.dirtype
  • click on OK

After clicking OK a new box will ask you to Enter the string value. Enter this:

  • 3
  • click on OK


VII. Add the uri tag

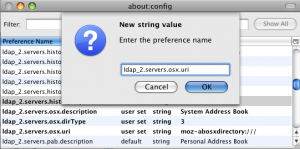
And again friends: as shown add a New > String value. You will be asked to Enter the preference name, then. Enter this:

  • ldap_2.servers.osx.uri
  • click on OK

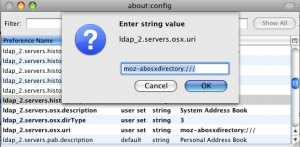
After clicking OK a new box will ask you to Enter the string value. Enter this:

  • moz-abosxdirectory:///
  • click on OK

You’re almost done.

Just restart your Thunderbird and you will have entries of your OS X’s Address Book available in Thunderbird.

VIII. Conclusions

We found no problems with our system configuration during testing. But as said: Thunderbird 3 is alpha status. Problems and issues may occur on your system and alpha status also means there will be changes to the final version.

If you find this article helpful, please consider visiting our non-offensive sponsor (Google-Adsense). Thanks for paying attention.