Tag Archives: Howto

[Muzaq] Ableton Live 8.3 Released & Live Lite 8.3 Free For SoundCloud Members

Ableton Live 8.3 Update
Berlin based music software company has just released the Ableton Live Update 8.3, now featuring Soundcloud integration and autoupdate. Ableton Live now comes with 6 months premium membership for SoundCloud.

Ableton Live Lite For Soundcloud Members
For all the SoundClouders Ableton gives away for free a copy of Ableton Live Lite 8.3. This might be especially interesting for producers using a different DAW like Emagic’s erm Apple’s Logic, Steinberg’s Cubase or Propellerhead’s Reason at the moment. This offer is valid until May, 31st. If you don’t have a SoundCloud account, it’s time to get one, now :-) You may also register at SoundCloud using your Facebook account.

Continue reading

[iPhone] HowTo Make MMS Work on iPhone 2G

NOTE: This walkthrough is for iPhone OS 3.0 only!

For MMS on iPhone 2G with firmware 3.1, buy SwirlyMMS on Cydia Store

I. Abstract

Many iPhone 2G users are not very amused about Apple’s update policy. As of iPhone OS 3.0, owners can eventually use MMS on their iPhones. All owners? No, not the ones who have iPhones from the very beginning.

The MMS feature is not officially available on the iPhone 2G, although there is no technical reason for the limitation – as we’ve seen with SwirlyMMS.

This seems to be one of Apple’s ways to tell you you need to get a new iPhone at least every two years. Quite expensive you think? Right, but get used to it as this seems to be Apple’s business strategy of lifecycles with many products.

Anyway, Apple provides one of the best user experiences for their products and that’s the point why you are here reading these lines.

To make things short. There is a way to make MMS work on the iPhone 2G with firmware 3.0. Kudos fly out to Geniusan for the ActivateMMS2G patch, and to Craig_16 (this walkthrough is based on his findings!).

II. Requirements

You need to have the following configuration:

  • an iPhone 2G with iPhone OS 3.0 (Warning don’t try this on an iPhone 3G or 3Gs, you’d be screwed!!!)
  • jailbroken (find Jailbreak HowTo here)
  • with Cydia running

Of course you’ve done a backup of your contacts, your calendar, and your photos, didn’t you?

And you need to have your carrier settings available (!!!!). Search MMS settings here before you proceed! In the following example we’re going to use a reseller of the german T-Mobile network called Callmobile. Callmobile got these settings:

Internet / Wap Callmobile Germany
APN internet.t-mobile
Username tm
Password tm
Visual Voicemail (not available!)
APN
Username
Password
MMS settings
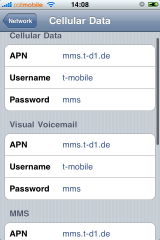
APN mms.t-d1.de
Username t-mobile
Password mms
MMSC http://mms.t-mobile.de/servlets/mms
Proxy 172.28.23.131:8008

blank
III. Preparations

The preparation steps are intended for user who already have tempered to make MMS running but failed. Those steps help restoring the iPhone to a status where we can eventually enable the MMS feature. Our recommendation: if you didnot try to make MMS running yet, you may want to read these steps anyway and apply most of the steps as available.

Pre.Step 1: Resetting Cellular Data Profiles

If you already tempered with the network settings to make MMS work, you first need to reset the settings. On your iPhone go to

  • Settings » General » Network » Cellular Data Network
    If the Cellular Data Network menu is no available: that’s no problem, we’re gonna enable it later. Jump to Pre.Step 2.
  • Scroll down and click on Reset Settings

  • Confirm question with a click on the Reset button
  • Click the Network button to leave the settings menu and
  • Reboot your iPhone

Pre.Step 2:  Removing Cellular Profiles

On your iPhone go to

  • Settings » General » Profile

    Again: if this menu is not available, we’re gonna enable it later. Jump to Pre.Step 3.
  • Click Remove
  • Confirm Remove
  • Reboot your iPhone now

Pre.Step 3: Uninstalling ActivateMMS2G

On your iPhone go to

  • Cydia (available on jailbroken iPhones only! Wanna do a jailbreak now? Go here.) and
    Click Manage

  • Click Packages
  • Click ActivateMMS2G
  • Click Modify
  • Click Remove
  • Click Confirm
  • Click Reboot Device

IV. The Walkthrough

After having applied all the preparations we now have the situation that all of us should have almost the same conditions with the cellular network settings. This is an important condition.

Step 1. Installing ActivateMMS2G

On your iPhone go to

  • Cydia (available on jailbroken iPhones only! Wanna do a jailbreak now? Go here.)
  • Click Search,
    Enter manually ActivateMMS2G, and when found:
    Click ActivateMMS2G

  • Click Install and Confirm


  • Click Reboot Device

Step 2. Installing A Custom Profile

On your iPhone go to

  • Safari and open this website: http://help.benm.at (kudos!)
  • Scroll down and click Mobilconfigs create
  • now the fun part starts, as here many issues may occur if you don’t pay attention
  • In contrast to what the fields’ description show we enter in all fields the required mms settings, got it? According to our example for Callmobile we enter this:

    click Enable Thethering
    and click Generate
  • you’ll be asked if you wanna install a new profile: Click Install
  • Confirm with Install Now
  • Click Done
  • Now quit Safari
  • Don’t check the settings, but
  • again Reboot now

Step 3. Adding Appropriate Cellular Settings

On your iPhone go to:

  • Settings » General » Network » Cellular Data Network
  • Now you see, that the MMS settings are present in all fields, of course this is wrong.
  • Now remember one thing: don't touch or edit the following entries: MMS/APN, MMS/Username, and MMS/Password. Once edited manually they will be lost and missing, because they will not get saved after leaving the menu. You would then have to start over above with point III. Preparations. You got me, right?
  • Enter MMSC and MMS Proxy first.
  • For Callmobile Germany (see above)
    MMSC is http://mms.t-mobile.de/servlets/mms and
    MMS Proxy is 172.28.23.131:8008
  • The result will look like this:
  • Click the Network button to leave the settings menu and
  • do a Reboot now to make sure the iPhone has loaded the new MMS settings

Step 4. Sending two Test MMS’

What we here basically do is, we’re gonna send the MMS to us. This allows us to check if receiving works and this also auto-enables the MMS feature on many carriers worldwide (not with AT&T in the U.S., sorry). After sending the first MMS you may receive an SMS instead that tells you you can watch the MMS on the internet. This is because the carrier has not updated your MMS capability yet. Now wait about five minutes and send another MMS to your own iPhone. This time you should receive it.

This is how we do it. On your iPhone go to:

  • Messages
  • Click on New Message icon (also note that a camera icon will be left to the text field)
  • Enter your own iPhone cell number
  • Click the camera icon and take a photo


  • Back in the Messages app, click the Send button
  • Your first MMS will be send now
  • As already written above: you should be either receiving now a text message telling you to read the MMS on the internet or you receive the MMS. If you only get a text message wait a couple of minutes and try again.

If anything does not work: we recommend to check the internet for your carrier specific settings. In 99% of the cases it is not related to the iPhone, but due to wrong carrier settings. Or your carrier simply has deactivated the MMS feature for your subscription (i.e. AT&T)!

Step 5. Editing the EDGE/GPRS Internet Settings

Again on your iPhone ;-) go to:

  • Settings » General » Network » Cellular Data Network
  • Edit the Cellular Data fields
  • As written in the beginning, for Callmobile Germany take this:
    APN is internet.t-mobile
    Username is tm
    Password is tm
  • Click the Network button to leave the settings menu and
  • Reboot your iPhone

V. Final words

You should check if your EDGE/GPRS settings work by deactivating your Wi-Fi and go online via GPRS/EDGE only. People reported it may be slower than before. We cannot confirm this. EDGE/GPRS is slow like hell anyway. If you are running a subscription that supports Visual Voicemail you can also enter the appropriate information after reboot and test if it works.

Did we tell you about our sponsors? They help us maintaining this site free. You may visit them to check their coolest offers. Thanks! If you got questions, additions or shouts, don’t hesitate…

[iPhone] GeoHot releases iPhone 3Gs Jailbreak (Upd.)

Update July 5th, 2009: GeoHot now also provides a Mac OS X version of the jailbreak tool. Windows and Mac versions ready for download at purplera1n.com

That’s it with the 3.0 firmware and the iPhone jailbreaks. Apple has been beaten again. This time by GeoHot. Although the iPhone Dev Team seems to have their programs already prepared they preferred to wait with the release of an updated PwnageTool. GeoHot did not wanna wait and decided to release a Windows based jailbreak tool for the iPhone 3Gs called PurpleRa1n.

Status

All three iPhone generations can now be activated, jailbroken and unlocked with the current firmware 3.0. Currently for the iPhone 3Gs there is only a Windows version available that is under strong beta testing. Anyway you can give it a try. The security whole that gets exploited in the iPhone 3Gs is well known as the 24k bug that has been found in january in the iPod Touch 2nd generations.

After jailbreaking, the iPhone Dev Team’s UltraSn0w should unlock your baseband.

Our recommendations

By now you know we are the conservative ones. We recommend: wait a couple of days. PurpleRa1n is still beta. But can hacks ever become stable? ;-)

More information to be found here:
» GeoHot accounces jailbreak for iPhone 3Gs
» iPhone Dev Team confirm unlock of iPhone 3Gs
» Get iPhone 3Gs jailbreak tool (PurpleRa1n.exe) here

iPhone 3GS Unlock Demonstration from planetbeing on Vimeo.

[iPhone] Activate MMS on iPhone 2G? (Update)

Update July 04, 2009: MMS now works, MMS server settings are getting saved with the help of some (more or less complicated) tricks. We’re currently prepping a fool proof step-by-step tutorial for all of you. We recommend to not play around with those settings at the moment to not screw up settings worse. Tutorial will be up on Monday. Please wait until then. Thanks for your attention.

Update July 05, 2009: Wanna know how to enable MMS on iPhone 2G? Find our definitive MMS on iPhone 2G HowTo here

Abstract

Since SwirlyMMS has been released last year we know the iPhone 2G is capable to send MMS. Anyway with their newest update Apple makes MMS available only for 3G and 3Gs customers. They say it is hardware related. This is not the case.

What has been found

It was quite logical that some people would be starting to investigate and research into the MMS feature sooner or later. Now an application has been released through Cydia that claims to unlock MMS capability for the iPhone 2G. It is called ActivateMMS2G and it is distributed on the iSpazio repository. Anyway we recommend not to install it as of now. to read our definitive MMS on iPhone 2G HowTo here.

Current Status

The status is almost alpha. Most forum reports indicate these issues:

  • MMS settings are not getting stored if they differ from the EDGE settings (occurs on any iPhone)
  • iPhone does not restart (rarely reported)
  • Camera symbol is not shown in Messages.app (often reported)

Our Recommendation

Don’t misunderstand us, but this is deeply alpha. If you really want MMS on your iPhone 2g, get yourself SwirlyMMS. It is much safer than tempering with ported hacks from 3G iPhones to 2G iPhones. SwirlyMMS is currently getting ported to iPhone OS 3.0. then follow our definitive MMS on iPhone 2G HowTo here.

[iPhone] HowTo Jailbreak and Unlock using RedSn0w

I. Abstract

The following article will show you how to install firmware 3.0 on your iPhone 2G by also allowing to jailbreak, activate and eventually to unlock (JAU process). At the moment of writing this article is for Mac OS X users with iPhone 2G’s only.

II. Who needs this article?

We suppose 50% of all 2G users around the globe. As iPhone 2G’s were sold almost everywhere with Sim-Lock enabled (besides some T-Mobile Germany or Orange France unlocked 2G’s).

III. Warning

You’d better read all of this in detail before you do anything practically! If you feel there is something you don’t understand or something you will not be able to handle, then go and ask someone who is in the know.

!!!!!!!! Otherwise your devices may be terribly screwed up! !!!!!!!

IV. Required Downloads

Download these tiny things first:

» RedSn0w for Mac OS X
» iPhone OS 3.0 for iPhone 2G
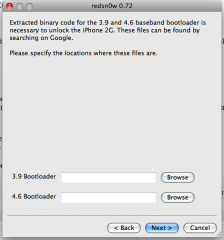
» if you are using an iPhone 2G: get Bootloader 3.9 and 4.6

RedSn0w is almost the same as QuickPwn was in the ancient days of iPhone firmware 2.x

V. Preparing for Take off

  1. you need to have iPhone OS 3.0 already installed / updated /restored via iTunes
  2. install RedSn0w
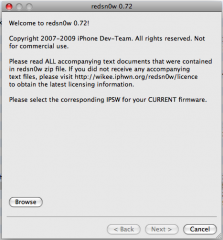
  3. start RedSn0w
  4. Browse to the downloaded restore firmware (iPhone1,1_3.0_7A341_Restore.ipsw)
  5. Wait for the firmware to be checked

  6. Click Next
  7. Wait for the firmware to be modified
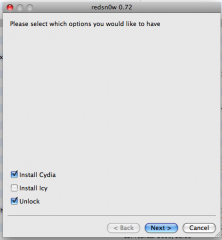
  8. Select Install Cydia (and Unlock if you are using an iPhone 2G. If you are using an iPhone 3G, don’t select to unlock, since it will not work this way)
  9. Click Next
  10. Browse for the Bootloaders you downloaded
  11. Click Next
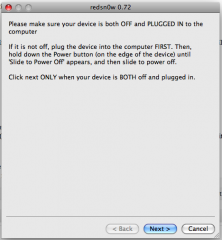
  12. Turn your iPhone off
  13. Turn iTunes off

VI. Fasten your seat belts // Get into DFU mode

  1. Click Next
  2. bring out beloved jesus phone into DFU mode
  3. RedSn0w guides you thru the required steps (anyway this may take several repetitions as this is not as easy as some people write on the net!)

VII. Ignition sequence start

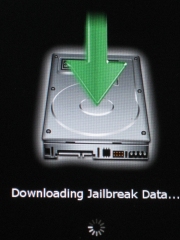
  1. the uploaded modified ramdisk will do all the required stuff
  2. to indicate what is going on your iPhone will show some nice pictures like this:
  3. don’t disturb the process
  4. instead: relax and get yourself a good drink or a cigarette
  5. as this may take some minutes

VIII. Possible issues

Although we haven’t been reported any yet, this doesn’t mean there can’t go something wrong. If you run into problems, try:

  • restoring original unmodified 3.0 firmware from within iTunes 8.2
  • make sure you installed firmware 3.0 with iTunes 8.2
  • generate a custom pre-hacked ipsw using PwnageTool (find article here)

IX. Kudos

Fly out to the iPhone Dev Team. You guys should get paid by Apple…

[MacOS] HowTo Update to MacOS X 10.5.3

Update 02.07.2008: MacOS X 10.5.4 is out now. See our notes here.

I. Abstract

Three days ago (May, 28th) Leopard update 10.5.3 has been released. It solves several security issues and application issues (read details here). So sumed up: you should update. Being on a Hackint0sh we need to take some things into consideration because we cannot use the built-in auto update.

The following article shows how to upgrade your Intel based Hackintosh to version 10.5.3. The approach is pretty much the same like updating to 10.5.2 and can be applied to both updates.

One limitation: the whole update process is currently only applicable to close-to-original-mac-hardware and is being done manually. Note: we did not test this on AMD based Hackintoshs.

Note to first timers: after having installed the update. The updater asks you to reboot. Do not hit the restart button eventually, instead read on. Some more steps need to be applied before you are allowed to reboot. Don’t say, we didn’t warn you!

II. Enable root user

In case you did not enable root user access to your system yet, this is a good time to do that. This has been described a thousand times elsewhere, so we won’t delve into this too deep:

  • Open Directory Utility.app
  • click the Lock to allow changes (!)
  • then Edit > Enable root user > supply password of your choice

III. Obtain update package

For manual update we need to get the updater.

IV. Back up important data and custom kexts

Backup important data like

  • documents
  • emails
  • muzaq
  • videos
  • downloads etc.

Don’t say we didn’t warn you in case anything goes wrong for whatever reason. After having done the backup of your personal data, do the backup for your system specific kexts.

Most simple way is using a terminal. Do the following:

  • hackint0sh$ su
    (provide root password)
  • hackint0sh$ cp -r /System/Library/Extension/KEXT-I-WANNA-BACKUP /TARGET/FOLDER/KEXT-I-WANNA-BACKUP

That kexts might be:

  • Audio
  • LAN
  • WLAN
  • Graphics Adapter etc.

This highly depends on your hardware. I am running an ASUS P5LD2 VM DH with a Sapphire HD 2600 XT. In my case I only need to backup my Natit.kext device driver and dsmos.kext, because history taught me a strange lesson once.

V. Use monitoring script

Since AppleIntelCPUPowerManagement.kext would simply kill our systems we need to make sure it does not become loaded into the kernel. So netkas supplied a little command line, which monitors the install of that file and if found removes it. You need to be logged in as root:

  • hackint0sh$ while sleep 1 ; do rm -rf /System/Library/Extensions/AppleIntelCPUPowerManagement.kext ; done

This command line must run until the end of the update.

VI. Process the update

Just mount your downloaded MacOSXUpdCombo10.5.3.dmg and begin your update. When the update process is complete

! ! ! ! _ d o n ‘ t _ i n s t a n t l y _ c l i c k _ r e s t a r t _ ! ! ! !

Instead of restarting, stop the while command line from step V. Stop it by hitting CTRL and C and read on, but don’t restart your system, until we say it.

VII. Modify startup script

Sadly, we are not running OS X on original hardware. The consequence is we are missing a chip for the fan control that holds a specific key (Alexander Graf told about the details here – german only). This key is necessary to run the graphical interface Aqua of Mac OS X (in fact: this key decodes the binaries – details about the binary protection are provided by Amit Singh here).

To make a long story short: we don’t want the operating system to look for that specific chip and key, we can supply it easier (via emulator). Netkas provided the emulator called dsmos.kext (kernel extension) for that problem as well.

Simply do the following (I assume you know how to use nano, you can also use vi or whatever you prefer).

  • hackint0sh$ nano /System/InstallAtStartup/scripts/1

In that 1 file there must be a line of code like this (old)

  • /System/Library/Extensions/Dont Steal Mac OS X.kext

This needs to be changed to this (new):

  • /System/Library/Extensions/dsmos.kext

Then save and exit. Using nano simply click CTRL and X, you will be asked if you wanna save before exiting.

VIII. Restoring kexts

We highly recommend you are logged in as root on a command line. In step IV. you saved your specific kexts. Now is the time to recover them to this folder:

  • /System/Library/Extensions

We will not explain how to use the copy command: this is the learning curve for today 8-))

IX. Reboot your machine

After having restored your system specific kexts. You reboot your machine. On first reboot, screen will not show the GUI but will show a black screen for about 3 minutes. It will then reboot again and it will take about 3 minutes again to show you the GUI (in our case the login window).

Shouts fly out to Netkas who’d better call himself +netkas and to Davil Elliott ;-) Live long and prosper, dudes!

And finally a word by our sponsor, who reduces our costs for this project at least a bit. Take them advertisments into consideration, would you? Thanks in advance!


[Linux] Setting up a LAMP Webserver with Apache, PHP, MySQL on Debian Etch

In our Linux Debian section the following articles have been published during the last weeks:

  • How to secure your Debian server by changing the SSH port number (read tutorial here)
  • How to secure your Debian server by setting up SSH for passwordless login via public- and private-key cryptography (read tutorial here)
  • How to secure your Debian server by updating the buggy openSSH Debian package (read tutorial here)
  • How to secure your Debian server by configuring a GUI based Firewall named Firestarter (read tutorial here)
  • How to simplify Debian administration by setting up a graphical interface (GNOME) to be used via VNC connection thru an SSH tunnel (read tutorial here)

I. Abstract

This time we’re gonna set up a LAMP (Linux – Apache – MySQL – PHP) webserver. Furthermore we will consider the basic security implications for such a server. Follow us into the amazing world of Debian server configurations. This article will take you about 60 minutes to follow straightforward (and well it took us a lot more than those 60 minutesto prepare, but nevermind, just click our sponsor to help us, when you found the tutorial helpful).

II. Requirements

Hic at nunc, we need to have an SSH connection (better is a running VNC connection (read tutorial here) to our Debian server, because dumbed down: to eventually access the webserver from all over the web, we will configure our firewall using the Firestarter GUI – read tutorial here)

III. Install and test Apache 2 and PHP 5

III. Part I. Installing Apache 2 and PHP 5

We assume you logged into your server as root. Enter that command:

  • server$ apt-get install apache2 php5 libapache2-mod-php5
    (yes we can use the apt-get install command to install more than just one package, in this case we use it to install three packages consecutively)

III. Part II. Creating a PHP test file

Standard path of your www web folder will be /var/www . For checking if everything went well, we simply create a phpinfo script. Take your favourite editor like vi, vim, joe or nano. We use nano…

  • server$ nano /var/www/test.php

Fill that command into your editor:

  • <?php phpinfo(); ?>

And save and exit (in nano: ctrl+x).

III. Part III: Checking via VNC

When you followed all our other articles about configuring a server, you will have the Firestarter running as a frontend to the iptables firewall. At this point we highly recommend to still block and disallow any incoming connections on port 80, since we will install phpmyadmin and it would be available from all over the net. For Firestarter this means: the only port that has been opened by you explicitly still is the SSH port.

For testing our php environment it is much safer to perform an SSH tunneled VNC connection and start a browser on that server. Which points to http://127.0.0.1/test.php

When everything went well, you will see your server specific PHP configuration.
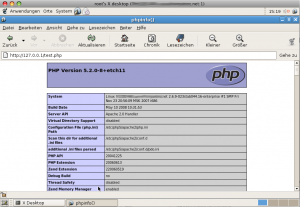
As this file simply tells to much server internals and since we really don’t need it anymore, we strongly recommend removing it now.

  • server$ rm /var/www/test.php

A file like that is easily forgotten and could become a serious security danger…

IV. Install MySQL, PHP5 connector and phpMyAdmin

IV. Part I. Installing MySQL

We still assume, you’re logged into your server as root. Enter the following command:

  • server$ apt-get install mysql-server mysql-client php5-mysql
    (this time we again install three packages, we could have installed php and mysql even in one step, means we would have supplied an apt-get install with six commands)

IV. Part II. Configuring MySQL

All of us know about the bad guys being outside. We can make their lives a little more difficult by applying a default root password for MySQL. Do the following as root:

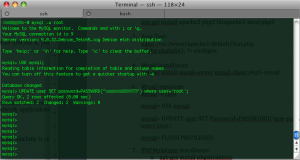
  • server$ mysql -u root
    (login as user root)
  • mysql> USE mysql;
  • mysql> UPDATE user SET Password=PASSWORD('yournewpasswordgoeshere') WHERE user='root';
  • mysql> FLUSH PRIVILEGES;
  • mysql> quit;

V. Installing phpMyAdmin

You are logged into your server as root, aren’t you? Enter those commands:

  • server$ apt-get install phpmyadmin

V. Part I. Security precautions for phpMyAdmin I

During the installation of phpMyAdmin a symbolic link will be created to make phpMyAdmin available under that address: http://yourserver.net/phpmyadmin.

We feel this is not a good idea and not a very secure way here. Even if you already set the MySQL root password, it is no good idea to leave standard settings at that, since all the bad guys know this, aswell. So we have two options. First we just put an .htaccess file into that folder. That would work, but has the little disadvantage, that it would show the bad guys that the address http://yourserver.net/phpmyadmin really exists. Therefore we prefer option 2: we make phpMyAdmin available from localhost (means from within the server) only and move it to a new place and make it accessible on a specific port only (we use a non privileged port for that). We still can access our beloved phpMyAdmin simply via SHH tunneled http or SSH tunneled VNC directly on the server.

  • server$ unlink /var/www/phpmyadmin
    (we remove the symbolic link, means pointing to http://yourserver.net/phpmyadmin won’t return any results anymore)

V. Part II. Security precautions for phpMyAdmin II

Since even we still cannot access phpMyAdmin, we need to change the Apache configuration a little bit. Take your favourite editor (we again use nano here) and do that:

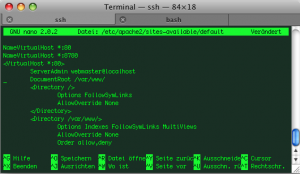
  • server$ nano /etc/apache2/sites-available/default

Right in the beginning of that file change (old):

  • NameVirtualHost *

to (new):

  • NameVirtualHost *:80
    NameVirtualHost *:8780

Then change (old):

  • <VirtualHost *>

to (new):

  • <VirtualHost *:80>

and after the closing </VirtualHost> tag, we insert this:

  • <VirtualHost *:8780> Alias /my-pma-is-not-accessible/ "/usr/share/phpmyadmin/"

    <Directory "/usr/share/phpmyadmin/">

    Options Indexes Multiviews FollowSymLinks

    AllowOverride None

    Order deny,allow

    Deny from all

    Allow from 127.0.0.0/255.0.0.0 ::1/128

    </Directory>

    </VirtualHost>
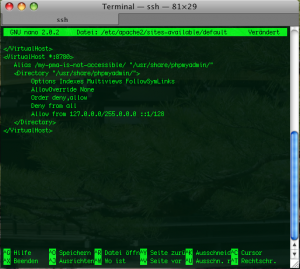
As we can see, we specify 127.0.0.1 (localhost) as the only Allow from address and bind access to port 8780. So our phpMyAdmin will now be accessible from http://localhost:8780/my-pma-is-not-accessible (== port 8780) only. Since port 8780 is behind our firewall and is not accessible from outside, we are quite safe for the beginning.

V. Part III. Security precautions for phpMyAdmin III

As mentioned before we got two ways for accessing our beloved phpMyAdmin now. The first is simply using our VNC connection and start a browser on our server machine and let it point to http://localhost:8780/my-pma-is-not-accessible . The second way is simply forwarding the port 8780 to our local client browser via SSH tunnel.

Having bound the phpmyadmin access to the new port 8780 solves here another issue: forwarding of privileged ports would require root privileges on a client machine. Our somewhat unpurified trick to make Apache listening on a second non privileged port allows us forwarding to a client machine without a hitch.

Let’s edit /ect/apache2/ports.conf

  • server$ nano /ect/apache2/ports.conf

Let’s make it listen to that second port mentioned. Inside the ports.conf add this parameter
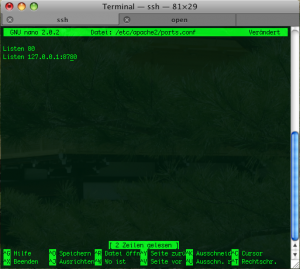
  • Listen 127.0.0.1:8780

By now you might guess what this configuration targets at. It creates a listen port for apache on our beloved port 8780 but only for network cards that have the IP address 127.0.0.1. Means in case our firewall would go down and port scanning would give results, there wouldn’t be any results from port 8780…

After that we simply restart our Apache via:

  • server$ /ect/init.d/apache2 restart

VI. Setting up SSH tunnel for http connection

Ok now we almost made it. For security precautions and for server performance reasons it makes sense to not use VNC connections all the time, although it works. But as it is more comfy to edit phpMyAdmin on your local client machine, we simply set up an SSH tunnel thru our server’s firewall and let it forward http from within the server to our local machine.

This can simply be done by entering this on your client’s terminal:

  • client$ ssh -f -N -L 8780:localhost:8780 root@yourdomain.net -p 8722

Congratulations, you’re almost done. You can now start a webbrowser of your choice and let it point to:

  • http://localhost:8780/my-pma-is-not-accessible

et voilà, you’re smack in your phpMyAdmin interface.
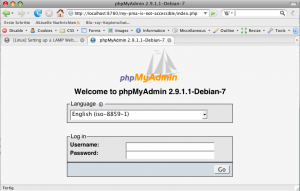
Killing your tunnel (and all other running SSH connections) can be done by simply entering on your client machine:

  • client$ killall ssh

VII. Conclusions

We hope you had some fun by conquering this learning curve. There are several points that we only touched on. We might consider applying other security features like faked error reports. We will deal with those faked error reports (means returning a 404 instead of 403) and comprehensive security techniques in forthcoming articles, because this would have lead us here astray.

If you found this article helpful: why not considering our sponsor’s offers? Thanks for re-enacting and now for something completely different: our sponsor …

[Linux] Installing a Firewall (Firestarter) via VNC on Debian

“and first for something complete different”: Muzaq… coding or administrating system can’t do without gooood muzaq. Check our latest tunes here :-)

In our Linux Debian section the following articles have been published during the last weeks:

  • How to secure your Debian server by changing the SSH port number (read tutorial here)
  • How to secure your Debian server by setting up SSH for passwordless login via public- and private-key cryptography (read tutorial here)
  • How to secure your Debian server by updating the buggy openSSH Debian package (read tutorial here)
  • How to simplify Debian administration by setting up a graphical interface (GNOME) to be used via VNC connection thru an SSH tunnel (read tutorial here)

I. Abstract

In this (very short) howto, we’re gonna setup a firewall with a graphical user interface (GUI) for GNOME. This firewall is called Firestarter. Our goal is to further improve safety of our server. We’re gonna do that on a Debian Etch system.

II. Requirements

Hic at nunc, we need to have a running VNC connection (read tutorial here) to our Debian server, because dumbed down: Firestarter is a nice (GNOME) GUI for Nefilter/IPTables (further details here).

III. Installation

Hic et nunc, we follow Kant’s question “What shall I do?”. We assume you logged into your server as root using VNC and opened a terminal. Do the following:

  • server$ apt-get install firestarter
    (installs the firewall)
  • server$ firestarter
    (starts firestarter for first configuration)

IV. Configuration

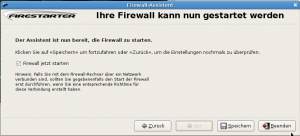
Firestarter auto recognizes your network card and device id (for example eth0 or venet0). Follow the wizard and click Save and Exit then (here because of german screen shots: Speichern und Beenden).


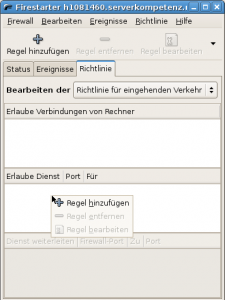
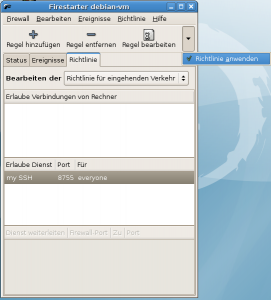
Then the main Firestarter window will open. Since we want to come back later on after having logged out of our server, we have to open at least one port for our VNC through SSH tunnel. Go to register Rules (here because of german screen shots: Richtlinie)

And add a rule (here because of german screenshots: Regel hinzufügen) for your specific ports.

V. Which ports

The following list is only an example you know best which services your server runs.

  • the normal VNC port will be 5901 or 5900 – since VNC communication is not encrypted on that port, we strongly recommend to only use a SSH tunnel for VNC sessions.
  • in case you followed our recommendation to use an SSH tunneled VNC connection you only need to open port 22, port 5901 or 5900 is not necessary
  • in case you followed even our recommendations to change your SSH port number to somewhat different, open that port instead (you may have a look at your /etc/ssh/sshd_config if you forgot the port number)
  • if you’re running an apache with a website, you probably need port 80, aswell

VI. Activate new rules

  • click on Apply Rule rule (here because of german screenshots: Richtlinie anwenden)

VII. Testing

Stay logged and open a second terminal and try to log in, if everything works you’re done. Thanks for your attention.

If this article helped you, please click our sponsor (Google-Adsense) and help us maintaining this project free. Thanks…