You are a heavy IMAP user with more than one IMAP account and with hundreds to thousands of mails in the incoming folder. After starting Entourage 2008 it tries to fetch the latest messages, but it just shows no reaction, but the spinning ball. Mac OS X’ activity monitor reports “no response”. Entourage has crashed.
Solution
Although it seems issues have been introduced after updating to a version below 12.1.7, it is the other way round. The latest update fixes a lot issues, but requires to initialize the IMAP configuration.
What to do
Be fast :-)
Start Entourage and…
immediately open Account Settings
Remove your current accounts from Entourage – this will take some time
According to the MacNews.de, the Germany based PearC, besides Psystar the second supplier of Mac clones, admonished the operator of the german blog Caf’é Digital. Café Digital reported about legal concerns of selling ready made Mac clone hardware with pre-installed Mac OS.
For their report, Café Digital used a modified PearC logo and told certain facts, PearC obviously did not want to read in the public. Sadly there is no information about the now censored parts of the Café Digital article about PearC.
We strongly recommend not to use any ready made clone hardware. As all these clone manufacturers are using solutions developed by the InsanelyMac and Hackint0sh community. You may check our EPOS I. installation script – which is provided for educational and for solely non commercial purposes.
If you can not set up a clone Mac yourself, get yourself an original Mac. For most of our every day life’s purposes a (refurbished) Mac Book should be sufficient.
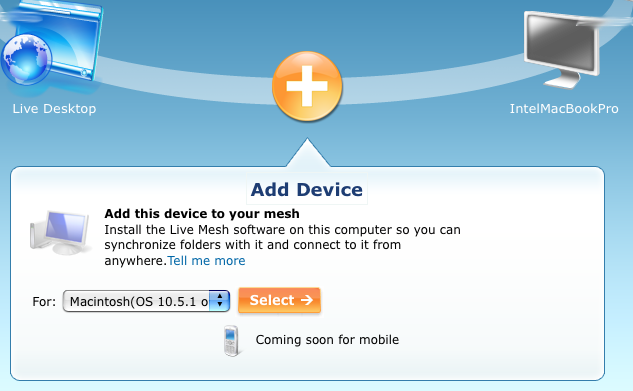
Microsoft’s new service Live Mesh targets at connecting different operating system platforms and even mobile devices for interchange of documents. Live Mesh allows accessing documents and files even via web interface. Live Mesh clients are available for Windows XP, Vista and for Mac OS X Leopard. Sadly there is no Linux version yet.
As the Live Mesh technology is still in development the last Mesh update for the Mac showed sad side effects.
Bug Description
The Mac OS version of Live Mesh can be started. Live Mesh seems to be busy for a while but before being allowed to login, Live Mesh eventually crashes. The Live Mesh icon next to the clock is available but the signin option is greyed out. Microsoft has addressed this issue in an article to be found here.
This issue has got nothing to do with if you are running a software hackintosh with EPOS I. nor a hardware hackintosh with EFI-X, this issue is also well known to genuine Macs.
Solution
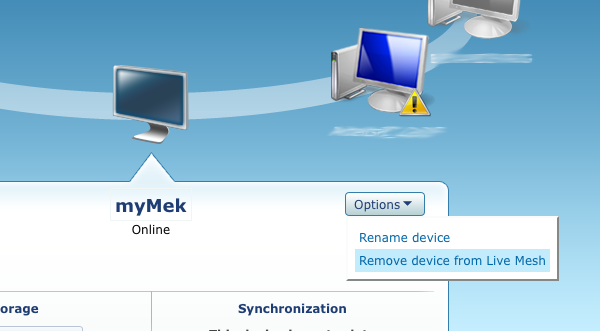
Resetting Live Mesh preferences and reinstalling Live Mesh
Reset Live Mesh preferences Part I.
Shutdown Live Mesh, if it is running in the background
Go to your Applications folder
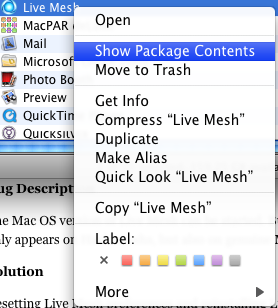
Right click on Live Mesh.app
Select Show Package Contents
Another Finder window will be opened
Select the Contents folder
Go to the Resources folder
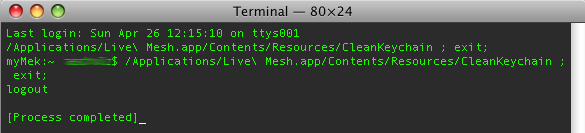
Double click the “CleanKeyChain” program
a terminal window will appear containing information like this:
Reset Live Mesh preferences Part II.
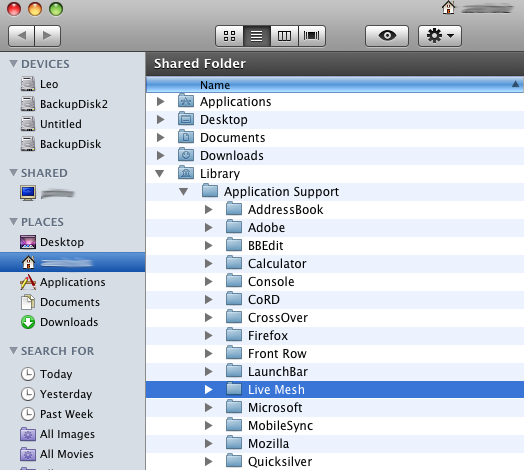
Open your home folder in the Finder
Go to this folder Library -> Application Support
Remove the Live Mesh folder (throw into your trash)
Have you ever wondered why the rechargeable battery in your laptop is covered by a shorter warranty period than the rest of your laptop? The reason is very simple. The life span of a laptop battery is much shorter. After only one year many batteries provide half the capacity they had in the beginning.
What is the reason?
The reason is fairly simple. When having been turned off, the laptop wastes a little bit of energy of the battery. Almost for nothing. When turning on your laptop the battery gets recharged again. But even if it’s only 1% or 2% that needed to be recharged, this reloading process is counted as a whole recharging cycle. Thus after having turned on and off your laptop twice a day for a period of 365 days, the battery has undergone most likely more than 700 recharging cycles. And the more recharging cycles it has undergone the worse its capacity becomes.
What can I do about it?
Althought the performance will become worse after some time, there are certainly some things to try:
If you use the laptop as a desktop PC substrate: you can remove the battery
Reduce the amount of reloading cycles: have your battery used until it’s almost empty, then recharge
Some more hints
Remember, that Li-Ion batteries lose capacity even if they are not used at all. Some people reported losses in capacity of up to 50% in two years. So the impact of using or not using may be big or just little in your case. Anyway, it’s worth a try.
In german forums people are rumoring that the NDS Videoguard encryption for the german Pay-TV channel Premiere has been compromised. As this has not been confirmed we currently expect this to be a hoax like the Nagra3 hack that has been reported in august 2008.
For completeness we release a translation of the hacker’s statement (original in german to be found here on Gulli.com) of the allegedly hackers:
NDS hack eventually confirmed!
In the meantime the NDS hack has been confirmed by an admin and a smartcard distributor. They have been send pre-programmed white DPSCs (digital pirate smart cards).
At this moment the NDS hack has only been confirmed to be working for Premiere (german Pay TV station). The hack is based on the NDS temp crypthack from october 2008. This has been the starting point. In combination with the BlueCryptCam that also has a weakness in its NDS Videoguard implementation.
With a little modification it then became possible to access and dump the NDS card’s Eeprom and Rom areas. If this hack can also be applied to Sky Italia or Great Britain is currently unknown and will take some time.
Kudelski seems not to be involved in this hack although this is rumored.
There won’t be any emulators (emu). The “blue cards” containing an own operating system will be released and distributed within the next week . They will be programmable using a Phoenix, CAS3 or Infinity programmer.
More news to come…
Kind regards from the Ukraine
From a technical point of view this statement does not look serious. As the described approach is far to vague. The described NDS temp crypthack was an exploit during the transition phase from Nagra2 Aladin to Nagra3 or NDS Videoguard. Some satellite receivers got an unencrypted firmware update over the air that allowed to watch Premiere even without any smartcard (more information in german here on Dragon-Cam.org). As this was only possible during the transition phase, it is highly unlikely that this might be the basis for a successful compromise of NDS videoguard.
Moreover even if this card was real, we would not expect this card to see the light of day. There haven’t been many NDS hacks in the last years. Among other gentleman like business practices (read on TheRegister.co.uk, on Denver Business Journal and on Wired.com) NDS as a company of Rupert Murdoch’s imperium is rumored to have hired the best investigators to at least monitor hacking scene activities.
Update: March 30, 2009: reliable sources from the scene say this is a hoax. Further information are not available currently.
Update: March 31, 2009:We found a nice “Wired” Video. Tarnovski – one of the best known hackers on this planet – describes how to hack nowadays smart cards. It “only” takes some equipment and a “little” bit of experience ;-)
We were working quite some time on this. Now here is EPOS I. – the “EFI Post Install” Script for white-box PCs that are almost hardware compatible with Apple’s devices
“EPOS I.” is an “EFI Post Install” Script
What does it do?
EPOS helps installing retail DVD’s of Apple’s Mac OS X 10.5 Leopard on white-box PC’s. EPOS is SlimBuild-Preboot compliant. And as such it makes installation very easy. Grab a copy of a SlimBuilt-Preboot CD image that matches your hardware (motherboard and graphics), then install Leopard and after installation run EPOS.
Technically EPOS I. automates the necessary steps of preparing MacOS’ native EFI partition and the installation of (legacy-) kexts to this EFI partition. The whole shebang was first discovered and described by Munky (all shouts fly out to him!). You may find his article here on the InsanelyMac forums.
Installation and Usage:
unplug ethernet cable from your white-box PC
copy EPOS I.zip to USB drive for instance
install Leopard from retail DVD using a SlimBuild-Preboot standard compatible CD (find links to tested disks below
boot installed Leopard using the SlimBuild-Preboot CD again
on first boot provide all the registration information required from Apple
see desktop for the first time
unpack EPOS I. and run it as ROOT from a terminal (have your SlimBuild-Preboot CD mounted)
EPOS takes about a minute to install everything
remove SlimBuild-Preboot CD from drive, reboot and let Apple’s autoinstaller grab the newest updates
enjoy a white-box Mek
Habit:
EPOS must be executed from the disk that will hold the EFI bootloaders.
If you are unsure what this means: better make sure you only have your DVD drive and your OS X harddrive connected.
I recommend using this script on a clean and fresh installed system, no other operating systems on the same disk!
prefers mounted SlimBuild-Preboot CD’s for getting kexts and the com.apple.Boot.plist
(looks for /Volumes/SlimBuild-Preboot/initrd.img and /Volumes/SlimBuild-Preboot/com.apple.Boot.plist)
if no SlimBuild-Preboot CD is found, EPOS tries to find Extensions in EPOS’ own Extensions folder
Supports:
autoextraction kexts from SlimBuild-Preboot CD
kexts in own Extensions folder
autoextraction com.apple.Boot.plist from SlimBuild-Preboot CD
com.apple.Boot.plist in own Plist folder
internally pretested with Leopard retail DVD’s 10.5.0, 10.5.1, 10.5.4 and 10.5.5
compatible to Galaxy’s SlimBuild-Preboot creator 2.0 (Kudos!) found here
Tested with ximekon’s (Kudos, aswell) Gigabyte GA-EP35-DS3 SlimBuild-Preboot CDs found here
Error handling:
integrated for a bunch of common errors, anyway it remains an ugly script
Todo:
code cleanup / rewrite ;-)
autoinstallation of custom kernels
GUI is in the works, but don’t ask for timelines, we all got jobs to feed our families
License & restrictions:
This script is freeware but may NOT be used for commercial purposes!
It may NOT be included in SlimBuild-Preboot Disks that contain original / modded Apple kexts.
that means until not everything is self enabled via homebrew or legacy kexts you may only include it in your private SlimBuilds but don’t distribute them, please.
EPOS 0.95 running on a sample system :
Feedback
You are welcome to leave a note here in the comment’s section or on the insanelymac forums.
Download EPOS
Please download from the version history overview below. Did you know our sponsors yet? No we neither. Because it’s just Google adds. Anyway these premium sponsors really got the coolest offers and moreover by considering them you help us in return maintaining this site free… :-)
Version history:
0.5 semi automatic really much too ugly one day rapid prototype (not released)
0.6 rewrote using functions (not released)
0.7 autodetermining of EFI partition (not released)
0.8 improved error handling for common errors we experienced (not released)
0.9 included autoextraction for SlimBuild-Preboot images (not released)
According to forum reports the iPhone DFU mode, which is required to install custom firmware with PwnageTool, does not get detected properly after updating Mac OS X to 10.5.6.
That means you cannot Jailbreak or Unlock the iPhone currently. The iPhone Dev Team has investigated in to this issue and comes to the conclusion that this is not a countermeasure by Apple, but a bug in the new kernel.
The Phone Dev Team names possible fixes for 10.5.6. As always: you do this at your own risk!
1. Replace the following plugin kexts from within IOUSBFamily.kext with the ones from 10.5.5 and then rebuild kextcache (if you don’t understand this, then you shouldn’t attempt it!)
Mac OS has the wonderful feature that it’s got a BSD compatible Unix enviroment called Darwin as the basis. You can get to it by simply starting the terminal. Once getting used to it you even install Cygwin to your Microsoft Windows installation because it simply is a powerful way of controlling your computer.
Anyway typos and forgotten parameters is pita once you entered some longer commands. Going back to the beginning of the line is real pain, using the right/left cursor arrows takes forever. But there are workarounds…
The following list shows some of the most common commands that help to use the terminal more effectively – derived from the old unix days btw.
Key
Function
Ctrl-A
jump to beginning of the line
Ctrl-E
jump to end of the line
Esc-F
jump forward word by word (requires to hit Esc every time again!)
Esc-B
jump backword word by word (requires to hit Esc every time again!)
Tab
completes the names of folders and files
BTW: Did you consider our sponsors yet, they really got the coolest offers. Thanks for helping us maintaining this page free.
You don’t like the Dock in 3D? You like it in 2D but sadly this is available only if you put the Dock to the left or the right side of the screen? There is a simply command that can help you :-)
In case you want to change it back to 3D for whatever reason, do this:
myUser$ defaults write com.apple.dock no-glass -boolean NO
myUser$ killall Dock
And it looks again like default:
If this article helped, consider our sponsors, they may help you aswell – at least they help us maintaining these pages, that help you. Got it? Thanks :-)