Author Archives: alexander

[Soccer] Public Viewing EM 2008 in Berlin

Ähnlich wie zur WM 2006 werden auch zur EM wieder große Public Viewing Veranstaltungen stattfinden, neben dem, was in den Bars und Cafés in den einzelnen Stadtteilen angeboten wird. Wer also lieber gemütlich sitzen möchte, sollte vielleicht doch lieber in seinem Kiez bleiben…

Folgende Großveranstaltungen werden stattfinden:

EM Fanmeile
Brandenburger Tor 23. – 29. Juni Eintritt frei, nur Halbfinale und Finale (?) Str. des 17. Juni (»Stadtplan)
|
Citadel Music Festival- Familien Fußball Fest
Wo? 07. – 29. Juni Eintritt frei,
Clowns, Showartistik, Zirkusschule
?
|
Kulturbrauerei im European Village
Kulturbrauerei 07. – 29. Juni Eintritt bei Deutschlandspielen: 3 Euro, sonst frei Knaackstr. Ecke Danzigerstr. (»Stadtplan)
|
Fußballtempel am Hauptbahnhof
Spreestrand 07. – 29. Juni Eintritt frei Friedrich-List-Ufer 6, (»Stadtplan)
|
11 Freunde EM Quartier
Arena (Fuhrpark) 07. – 29. Juni Eintritt frei, Liegestühle inbegriffen Eichenstr. 4 (»Stadtplan)
|
EM Studio Mitte
Admiralspalast 07. – 29. Juni Eintritt frei, Prominenz wird erwartet Friedrichstr. 101 (»Stadtplan)
|
Strandbars, Biergärten etc.
Strandgut 07. – 29. Juni Eintritt ? Mühlenstr. 61 (»Stadtplan)
Deck 5 07. – 29. Juni Eintritt ? Schönhauser Allee 80 (»Stadtplan)
Bundespressestrand 07. – 29. Juni Eintritt 6 Euro (incl. 1 Getränk) Kapelle-Ufer 1 (»Stadtplan)
Golgatha 07. – 29. Juni Eintritt frei Viktoriapark (»Stadtplan)
Pfefferberg 07. – 29. Juni Eintritt ? Schönhauser Allee 176 (»Stadtplan)

Aktualisierungen vorgesehen, dennoch: alle Angaben ohne Gewähr.

This might be interesting for you:


[Soccer] Spielplan EM 2008

Spielplan

Es ist wieder soweit. Die WM ist schon wieder zwei Jahre her und da beginnt auch schon wieder die EM. Im Folgenden der Spielplan mit Uhrzeiten und TV Sendern. Aktualisierungen inbegriffen. Bei schönen Wetter kann man die EM natürlich auch draußen mit Freunden auf einer Public-Viewing Veranstaltung (Liste hier) genießen, ist eh schöner als zu Hause.

Übrigens kann man bei unserem Sponsor (auf dieser Seite oben Links) vermutlich noch Karten für die Spiele bekommen, um Live und Vorort unserer 11 die Daumen zu drücken…

Spiele der Gruppen

Samstag, 07. Juni 2008
Gruppe A 18.00h ZDF Schweiz – Tschechische Republik 0:1
Gruppe A 20.45h ZDF Portugal – Türkei 2:0
Sonntag, 08. Juni 2008
Gruppe B 18.00h ZDF Austria – Kroatien 0:1
Gruppe B 20.45h ZDF Deutschland – Polen 2:0
Montag, 09. Juni 2008
Gruppe C 18.00h ARD Rumänien – Frankreich 0:0
Gruppe C 20.45h ARD Niederlande – Italien 3:0
Dienstag, 10. Juni 2008
Gruppe D 18.00h ARD Spanien – Russland 4:1
Gruppe D 20.45h ARD Griechenland – Schweden 0:2
Mittwoch, 11. Juni 2008
Gruppe A 18.00h ZDF Tschechische Republik – Portugal 1:3
Gruppe A 20.45h ZDF Schweiz – Türkei 1:2
Donnerstag, 12. Juni 2008
Gruppe B 18.00h ZDF Kroatien – Deutschland 2:1
Gruppe B 20.45h ZDF Österreich – Polen 1:1
Freitag, 13. Juni 2008
Gruppe C 18.00h ARD Italien – Rumänien 1:1
Gruppe C 20.45h ARD Niederlande – Frankreich 4:1
Samstag, 14. Juni 2008
Gruppe D 18.00h ARD Schweden – Spanien 1:2
Gruppe D 20.45h ZDF Griechenland – Russland 0:1
Sonntag, 15. Juni 2008
Gruppe A 20.45h ZDF Schweiz – Portugal (nicht im dt. TV) 2:0
Gruppe A 20.45h ZDF Türkei – Tschechische Republik 3:2
Montag, 16. Juni 2008
Gruppe B 20.45h ARD Polen – Kroatien (nicht im dt. TV) 0:1
Gruppe B 20.45h ARD Österreich – Deutschland 0:1
Dienstag, 17. Juni 2008
Gruppe C 20.45h ZDF Niederlande – Rumänien (nicht im dt. TV) 2:0
Gruppe C 20.45h ZDF Frankreich – Italien 0:2
Mittwoch, 18. Juni 2008
Gruppe D 20.45h ARD Griechenland – Spanien 1:2
Gruppe D 20.45h ARD Russland – Schweden 2:0
|

Eine kurze Werbeunterbrechung…


|
Viertelfinale

Donnerstag, 19. Juni 2008
Viertelfinale 20.45 ARD 1. Gruppe A (Portugal) –
2. Gruppe B (Deutschland)
2:3
Freitag, 20. Juni 2008
Viertelfinale 20.45h ARD 1. Gruppe B (Kroatien) –
2. Gruppe A (Türkei)
1:3 (Elfmeterschießen)
Samstag, 21. Juni 2008
Viertelfinale 20.45h ARD 1. Gruppe C (Niederlande) –
2. Gruppe D (Russland)
1:3 (nach Verlängerung)
Sonntag, 22. Juni 2008
Viertelfinale 20.45h ARD 1. Gruppe D (Spanien) –
2. Gruppe C (Italien)
4:2 (Elfmeterschießen)
|

|
Halbfinale

Mittwoch, 25. Juni 2008
Halbfinale 20.45h ZDF Sieger 19. Juni (Deutschland) –
Sieger 20. Juni (Türkei)
Donnerstag, 26. Juni 2008
Halbfinale 20.45h ZDF Sieger 21. Juni (Russland) –
Sieger 22. Juni (Spanien)
|

|
Finale

Sonntag, 29. Juni 2008
Finale 20.45h ARD Sieger 25. Juni – Sieger 26. Juni

|
Alle Angaben ohne Gewähr!!!
|
Wenn Sie die Informationen hilfreich finden, könnte das folgende Angebot auch interessant für Sie sein:

[Stories] noch mehr SPAM von Junkload

Stand vom 25.05.2008

Per gestern Abend (24.05.2008) treiben die Freunde der Firma Streamtaiment Inc., über die wir bereits hier und hier berichteten, wieder ihr Unwesen. Spam-Mails, getarnt als Mahnungen, wurden zu Tausenden versendet. Die Spam-Filter von 1und1, GMX und Web.de haben wieder nicht reagiert. So dürfen die Freunde aus Bocholt/Isselburg uns weiterhin Lebenszeit stehlen.

Tipps

In Ergänzung zu den Tipps hier, gilt generell:

  • Ruhe bewahren
  • Mahnungen, die nicht per normaler Briefpost kommen, können getrost ignoriert werden

Nachdem die anderen Abzocker Projekte Gametask.de und Freemoviez.de derzeit gesperrt sind, versuchen diese Typen wieder mit Junkload. Die Denic schläft derzeit weiterhin ihren Schönheitsschlaf, trotz der gefälschten und manipulierten Adressangaben…

Mails vom 24.05.2008

Die Orthographie der Mails erinnert uns übrigens an Mails… aber lassen wir das besser…

Betreff:
Zahlungsaufforderung // Letzte Mahnung

Sehr geehte(r) [removed]
,

Sie haben bisher immernoch nicht die offene Forderung in Höhe von 50 Euro bezahlt.

Betrachten Sie diese E-Mail als die letzte Aufforderung. Falls danach keine Zahlung eingeht werden wir umgehend unsere Anwälte einschalten.

Bezahlen sie umgehend über PayPal / Kreditkarte für eine schnelle Abwicklung:

http://junkload.de/rechnung.php?id=[removed]

Ihr Vertrag können Sie hier einsehen: http://junkload.de/template/agbs.php .

Jegliche E-Mail mit Beleidigungen und Drohungen wurden an unsere Anwälte weitergeleitet.

Für Fragen steht natürlich unser Support-Team zur Verfügung.

Mit Freundlichen Grüßen
Junkload.de

----------------------------------------------------------------------------------------------------------------------

Streamtaiment Inc.
99 Queens Road Central
31/F The Center
HongKong

Analyse der Mail vom 24.05.2008

Die Mails wurden gestern Abend über die IP Adresse 87.119.203.53 verschickt. Ein Whois zeigt, wer sich hinter dieser IP Adresse verbirgt. Nur leider lautet der Return Path auf www-data@s053.xfuture-media.info, was daraufhindeutet, dass ein gehackter Server oder zumindest eine Sicherheitslücke auf dem xfuture-media Server verwendet wurde, denn der Standarduser beim Apache Webserver heißt www-data…

Ansonsten ist noch interessant, dass der Received-By Tag auf gametask.de lautet, womit die Verbindung zwischen diesen Diensten sich wohl erhärtet.

Return-Path: <www-data@s053.xfuture-media.info>
Delivery-Date: Sat, 24 May 2008 21:00:48 +0200
Received: from gametask.de (s053.xfuture-media.info [87.119.203.53])
by [removed] (node=mxeu14) with ESMTP (Nemesis)
id 0ML3Dg-1Jzyz0228I-0000w6 for [mymailaddress-removed]; Sat, 24 May 2008 21:00:48 +0200
Received: by gametask.de (Postfix, from userid 33)
id 01317F9086; Sat, 24 May 2008 21:00:45 +0200 (CEST)

Mail vom 27.05.2008

Die “Freunde” bleiben nicht untätig und versenden seit heute früh wieder eine Kindergeburtstags-Mahnung. Wie man leicht erkennen kann, haben wir zum Spaß mal die eMail-Adresse von Junkload selbst eingetragen. Damit auch die Spam-Crawler im Netz mal wieder eine gute Adresse finden.

Nach der letzten Mahnung (siehe oben) erreicht uns diesmal übrigens wieder eine Rechnung.

Betreff: Mahnverfahren & Rechnung
Sehr geehte(r) info@junkload.de,

In dieser E-Mail erhalten sie ihren Vertrag zugesendet. Bitte lesen sie Ihn genau durch.
Alle Nichtzahlungen werden ab kommender Woche unserem Anwalt weitergeleitet.

Ihr Vertrag und Allgemeine GeschÀftsbedingungen:

http://junkload.de/template/agbs.php?id=info@junkload.de

Ihre noch ungezahlte Rechnung ( inkl. Mahnkosten ):

http://junkload.de/mahnschreiben.php?id=info@junkload.de

Falls sie diese Rechnung bereits bezahlt haben dann betrachten Sie diese E-Mail als
gegenstandlos. FÃŒr weitere Fragen sind wir gerne bereit Ihnen dort weiterzuhelfen.

Mit Freundlichen Gr�en
Junkload.de

Analyse der Mail vom 27.05.2008

Entweder haben die Jungens wieder einen Apache gefunden, der eine Sicherheitslücke aufweist (freeloaden.net) oder der Server gehört den Freunden selbst. Die Domain freeloaden.net ist erst am 25.05. angemietet worden. Weiter Infos unten.

Return-Path: <www-data@84-16-251-247.internetserviceteam.com>
Delivery-Date: Tue, 27 May 2008 08:09:14 +0200
Received: from gametask.de (freeloaden.net [89.149.245.225])
by [removed] (node=mxeu8) with ESMTP (Nemesis)
id 0MKt1w-1K0sMq3FyA-00085L for [mymailaddress-removed]; Tue, 27 May 2008 08:09:14 +0200
Received: by gametask.de (Postfix, from userid 33)
id 0012F30CD6; Tue, 27 May 2008 09:09:41 +0200 (CEST)

Ein WHOIS auf junkload.net bringt leider nichts, da die Adressdaten protected sind. Der dazugehörige Server (auf dem laut Gerüchten übrigens keine Firewall laufen soll!) gehört offensichtlich zum Netzwerk des Dresdner Providers justfourplay.de. Auf Anfrage eines Forums, das wir leider nicht verlinken dürfen, hat justfourplay.de schon den Inhaber der Domain ermahnt, das Versenden von Spam zu unterlassen – momentan mahnt hier echt jeder jeden, oder wie?

Summa summarum

Der Support des Hosters von freeloaden.net hat zugesichert, dass bei wiederholter Versendung von SPAM der Server sofort vom Netz genommen wird. Reichlich kulant, wie wir finden, bei dem, was schon in den letzten Wochen passiert ist. Update: seit 11.10h verschicken sie wieder über den freeload.net Server Spam-Mahnungen. Der Server sollte dann wohl bald vom Netz gehen.

Namen der Verantwortlichen

Die Emotionen der Betroffenen kochen derzeit sehr hoch, was man anhand Ihrer Kommentare unter unseren Artikeln sehr gut ablesen kann. Wir können dies gut nachvollziehen. Jedoch, auch wenn uns Namen bekannt sind und auch andere Seiten Namen von vermuteten Hinterleuten nennen, werden wir hier keine Namen nennen, die aus Gerüchteküchen stammen.

Bitte fragen Sie nicht nach. Persönlichkeitsrechte halten wir für ein wichtiges Gut. Laut Forenmeldungen liegen der Polizei und Staatsanwaltschaft diese Namen vor. Ermittlungen sind im Gange.

Wenn Sie diesen Artikel hilfreich fanden, ziehen Sie es doch bitte in Erwägung, unseren Sponsor zu beachten. Thanks for re-enacting and now for something completely different: our sponsor …

[MacOS] Integrate Mac Address Book into Thunderbird

I. Abstract

Mozilla Thunderbird 3 alpha has been released on May 13th. It’s got a wonderful (terrible) working title: “Shredder Alpha 1”. Anyway, there are two features that we Mac users definitly appreciate to read:

  • Thunderbird’s address book is now compatible with OS X’s system Address Book.
  • Thunderbird now is a native Cocoa application…

Well to be serious, we don’t really care if it is a native Cocoa app or whatever app it is, if it is running stable in the end. But we do care about the address book integration. For all iPhone users this is really good news. We never had the chance to use Thunderbird and have the email addresses synchronized with our beloved iPhone.

But there are disadvantages at this very moment. First being the integration. Integration of the address book is a one way street only. Currently we can only synchronize our iPhone with our Mac and have the addresses, phone numbers and mail addresses available in Thunderbird. But you still won’t be able to add new contacts, phone numbers or email addresses to your OS X Address Book using Thunderbird. Thunderbird 3 alpha has read access only. To change entries you need to use the OS X Address Book application. Second disadvantage is, the address book integration has been disabled by default, simply because this compatibility module is under heavy development. In this article we’re gonna show you how to enable it in simple steps.

As note: although we didn’t experience any problems while testing during the last week, we have to point out that this is an alpha release that is not intended for productivity use.

II. Requirements

  • Intel Mac or Intel Hackintosh (Power PC has not been tested, sorry)
  • Download and install Thunderbird 3 alpha (Shredder alpha 1) here.

III. Thunderbird’s Config Editor

We assume you already have Thunderbird 3 alpha installed. Follow these steps:

  • start Thunderbird
  • open Preferences menu
  • click the Advanced menu
  • in tab General you will find the Config Editor... button – click it

You will see a picture similar like that:

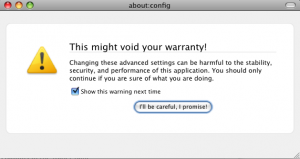
Since you know what you are doing, otherwise you would not be here reading this article, just click the “I'll be careful, I promise” button.

IV. How to add new values

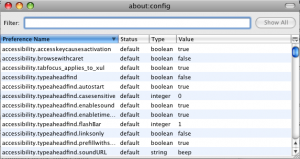
After having promised that you won’t destroy your own system, you will see a new window, which is titled “about: config“. The window will look similar like this:

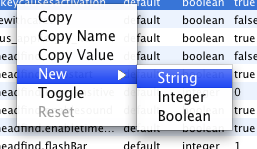
Some more instructions here: with a click on the right mouse button (or ctrl+left mouse button!) you open the context menu in the Config Editor.

V. Add the description tag

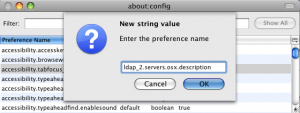
As shown add a New > String value. You will be asked to Enter the preference name, then. Enter this:

  • ldap_2.servers.osx.description
  • click on OK

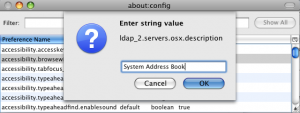
After clicking OK a new box will ask you to Enter the string value. Enter this:

  • System Address Book
  • click on OK

VI. Add the dirtype tag

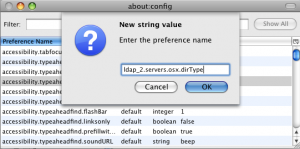
As shown add a New > String value. You will be asked to Enter the preference name, then. Enter this:

  • ldap_2.servers.osx.dirtype
  • click on OK

After clicking OK a new box will ask you to Enter the string value. Enter this:

  • 3
  • click on OK


VII. Add the uri tag

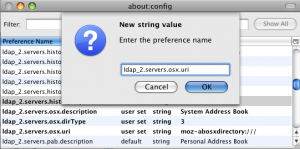
And again friends: as shown add a New > String value. You will be asked to Enter the preference name, then. Enter this:

  • ldap_2.servers.osx.uri
  • click on OK

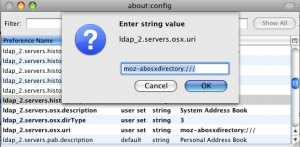
After clicking OK a new box will ask you to Enter the string value. Enter this:

  • moz-abosxdirectory:///
  • click on OK

You’re almost done.

Just restart your Thunderbird and you will have entries of your OS X’s Address Book available in Thunderbird.

VIII. Conclusions

We found no problems with our system configuration during testing. But as said: Thunderbird 3 is alpha status. Problems and issues may occur on your system and alpha status also means there will be changes to the final version.

If you find this article helpful, please consider visiting our non-offensive sponsor (Google-Adsense). Thanks for paying attention.

[Stories] Spam von Gametask.de

Wir hatten ja bereits vor einigen Tagen von den Machenschaften bei Junkload.de, Freemoviez.de und Datenklo berichtet. Die Junkload.de Seite ist seit neustem wieder erreichbar und kann somit weiter Schindluder treiben und User über den Tisch ziehen :-(

Tipp vorneweg

Der wichtigste Tipp, den wir an dieser Stelle nochmals geben wollen ist frei nach dem Motto “keep it simple”:

  • Klicken Sie niemals auf Links in Mails, deren Absender Sie nicht kennen.

Spam-Massenmails – diesmal von Gametask.de

Nun sind wieder einmal Massenmails versendet worden. Diesmal von einer Firma, die selbst angibt, ein Community Project für Gamer zu sein, in Wahrheit scheinen es aber die gleichen Jungens zu sein, die seit einigen Wochen mit ihrem Spam-Mails unser aller Lebenszeit stehlen. Die Seite heißt Gametask.de und ist auch schon vom Provider United-Internet gesperrt worden. Ende der Geschichte. Lustig, oder? Wäre da nicht dieses Stehaufmännchen Phänomen, was wir von Junkload.de und Freemoviez.de bereits kennen.

Gametask.de wurde vom Provider schon gesperrt

Geworben hatte Gametask.de damit, Usern, die eigene News verfassen 0,15€ pro News zu geben. Ein Wahnsinnsbetrag für eine News, für die man mehrere Minuten bis Stunden braucht, sie zu verfassen. Insgesamt scheinen den Jungs aus Bocholt (oder Isselburg) langsam die Felle wegzuschwimmen. Denn die Sperrung von Gametask ging diesmal so schnell, dass viele User ihre Fragen über Gametask in den Foren noch gar nicht zu Ende geschrieben hatten, da war die Seite schon wieder offline…

Denic sollte einschreiten

Aus unserer Perspektive wird das Katz und Maus Spiel wohl noch unendlich weitergehen, bis die Denic einschreitet und den Zugriff auf die Domains sperrt. Derzeit können diese Abzocker nämlich sehr einfach einen neuen Provider nehmen und einfach die Adresse auf den neuen Server mit neuer IP Adresse zeigen lassen. Ein endloses Spiel, denn es gibt wohl endlos viele Provider auf diesem Planeten. Domain Sperrung ist da wohl der einfachste Weg. Zumindest vorerst.

Wenn Sie diesen Artikel hilfreich fanden, ziehen Sie es doch bitte in Erwägung, unseren Sponsor (Google-Adsense) zu besuchen. Thanks for re-enacting and now for something completely different: our sponsor …

[e-Biz] It’s the end of Yahoo as we know it…

One of the biggest investors of our time bought a little share of Yahoo. Well little in this case literally means 3.5% which is currently about 1.3 billion US$. As we know very well from the past most of the companies (like Motorolla) in which he invested become split into smaller divisions.

And yes you already guessed right: Carl Icahn has arrived. You could ask if he is the Steve Ballmer’s joker in that game. Somebody may hope so, because people don’t like to read any more news about Yahoo acting touchy like before. Yahoo’s only future is a future together with Microsoft. And Ballmer is not interested in Yahoo. Yahoo is only a minor step here. Ballmer wants to compete with Google (see video here…).

The next months are getting very thrilling. We expect this merger to come. However we don’t expect Microsoft to buy the whole Yahoo divisions. That kinda offer has passed and Yahoo didn’t take it. Now with Icahn in the boat, Yahoo should realize that negotiations are almost over.

Icahn will replace Yahoo’s board of management and then the best offer will be accepted. First consequence is that Yahoo delays its General Annual Meeting from the beginning of july to the end. Icahn simply got too much paperwork in the process of replacing Yahoo’s board. We expect that the best offer at that point won’t include all of Yahoo’s divisions anymore. Microsoft simply don’t need all of Yahoo.

Let’s see what happens. One thing is for sure: Carl Icahn is the joker in that game. Nobody (besides Steve Ballmer probably) would have expected him to join that game…

[Linux] Setting up a LAMP Webserver with Apache, PHP, MySQL on Debian Etch

In our Linux Debian section the following articles have been published during the last weeks:

  • How to secure your Debian server by changing the SSH port number (read tutorial here)
  • How to secure your Debian server by setting up SSH for passwordless login via public- and private-key cryptography (read tutorial here)
  • How to secure your Debian server by updating the buggy openSSH Debian package (read tutorial here)
  • How to secure your Debian server by configuring a GUI based Firewall named Firestarter (read tutorial here)
  • How to simplify Debian administration by setting up a graphical interface (GNOME) to be used via VNC connection thru an SSH tunnel (read tutorial here)

I. Abstract

This time we’re gonna set up a LAMP (Linux – Apache – MySQL – PHP) webserver. Furthermore we will consider the basic security implications for such a server. Follow us into the amazing world of Debian server configurations. This article will take you about 60 minutes to follow straightforward (and well it took us a lot more than those 60 minutesto prepare, but nevermind, just click our sponsor to help us, when you found the tutorial helpful).

II. Requirements

Hic at nunc, we need to have an SSH connection (better is a running VNC connection (read tutorial here) to our Debian server, because dumbed down: to eventually access the webserver from all over the web, we will configure our firewall using the Firestarter GUI – read tutorial here)

III. Install and test Apache 2 and PHP 5

III. Part I. Installing Apache 2 and PHP 5

We assume you logged into your server as root. Enter that command:

  • server$ apt-get install apache2 php5 libapache2-mod-php5
    (yes we can use the apt-get install command to install more than just one package, in this case we use it to install three packages consecutively)

III. Part II. Creating a PHP test file

Standard path of your www web folder will be /var/www . For checking if everything went well, we simply create a phpinfo script. Take your favourite editor like vi, vim, joe or nano. We use nano…

  • server$ nano /var/www/test.php

Fill that command into your editor:

  • <?php phpinfo(); ?>

And save and exit (in nano: ctrl+x).

III. Part III: Checking via VNC

When you followed all our other articles about configuring a server, you will have the Firestarter running as a frontend to the iptables firewall. At this point we highly recommend to still block and disallow any incoming connections on port 80, since we will install phpmyadmin and it would be available from all over the net. For Firestarter this means: the only port that has been opened by you explicitly still is the SSH port.

For testing our php environment it is much safer to perform an SSH tunneled VNC connection and start a browser on that server. Which points to http://127.0.0.1/test.php

When everything went well, you will see your server specific PHP configuration.
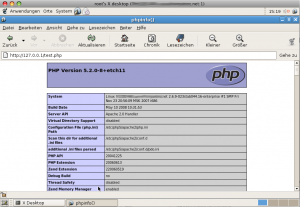
As this file simply tells to much server internals and since we really don’t need it anymore, we strongly recommend removing it now.

  • server$ rm /var/www/test.php

A file like that is easily forgotten and could become a serious security danger…

IV. Install MySQL, PHP5 connector and phpMyAdmin

IV. Part I. Installing MySQL

We still assume, you’re logged into your server as root. Enter the following command:

  • server$ apt-get install mysql-server mysql-client php5-mysql
    (this time we again install three packages, we could have installed php and mysql even in one step, means we would have supplied an apt-get install with six commands)

IV. Part II. Configuring MySQL

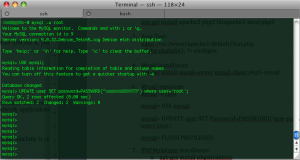
All of us know about the bad guys being outside. We can make their lives a little more difficult by applying a default root password for MySQL. Do the following as root:

  • server$ mysql -u root
    (login as user root)
  • mysql> USE mysql;
  • mysql> UPDATE user SET Password=PASSWORD('yournewpasswordgoeshere') WHERE user='root';
  • mysql> FLUSH PRIVILEGES;
  • mysql> quit;

V. Installing phpMyAdmin

You are logged into your server as root, aren’t you? Enter those commands:

  • server$ apt-get install phpmyadmin

V. Part I. Security precautions for phpMyAdmin I

During the installation of phpMyAdmin a symbolic link will be created to make phpMyAdmin available under that address: http://yourserver.net/phpmyadmin.

We feel this is not a good idea and not a very secure way here. Even if you already set the MySQL root password, it is no good idea to leave standard settings at that, since all the bad guys know this, aswell. So we have two options. First we just put an .htaccess file into that folder. That would work, but has the little disadvantage, that it would show the bad guys that the address http://yourserver.net/phpmyadmin really exists. Therefore we prefer option 2: we make phpMyAdmin available from localhost (means from within the server) only and move it to a new place and make it accessible on a specific port only (we use a non privileged port for that). We still can access our beloved phpMyAdmin simply via SHH tunneled http or SSH tunneled VNC directly on the server.

  • server$ unlink /var/www/phpmyadmin
    (we remove the symbolic link, means pointing to http://yourserver.net/phpmyadmin won’t return any results anymore)

V. Part II. Security precautions for phpMyAdmin II

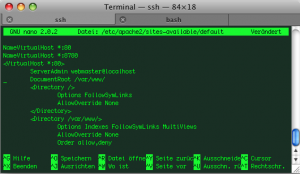
Since even we still cannot access phpMyAdmin, we need to change the Apache configuration a little bit. Take your favourite editor (we again use nano here) and do that:

  • server$ nano /etc/apache2/sites-available/default

Right in the beginning of that file change (old):

  • NameVirtualHost *

to (new):

  • NameVirtualHost *:80
    NameVirtualHost *:8780

Then change (old):

  • <VirtualHost *>

to (new):

  • <VirtualHost *:80>

and after the closing </VirtualHost> tag, we insert this:

  • <VirtualHost *:8780> Alias /my-pma-is-not-accessible/ "/usr/share/phpmyadmin/"

    <Directory "/usr/share/phpmyadmin/">

    Options Indexes Multiviews FollowSymLinks

    AllowOverride None

    Order deny,allow

    Deny from all

    Allow from 127.0.0.0/255.0.0.0 ::1/128

    </Directory>

    </VirtualHost>
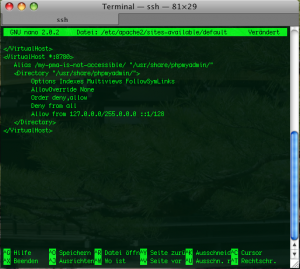
As we can see, we specify 127.0.0.1 (localhost) as the only Allow from address and bind access to port 8780. So our phpMyAdmin will now be accessible from http://localhost:8780/my-pma-is-not-accessible (== port 8780) only. Since port 8780 is behind our firewall and is not accessible from outside, we are quite safe for the beginning.

V. Part III. Security precautions for phpMyAdmin III

As mentioned before we got two ways for accessing our beloved phpMyAdmin now. The first is simply using our VNC connection and start a browser on our server machine and let it point to http://localhost:8780/my-pma-is-not-accessible . The second way is simply forwarding the port 8780 to our local client browser via SSH tunnel.

Having bound the phpmyadmin access to the new port 8780 solves here another issue: forwarding of privileged ports would require root privileges on a client machine. Our somewhat unpurified trick to make Apache listening on a second non privileged port allows us forwarding to a client machine without a hitch.

Let’s edit /ect/apache2/ports.conf

  • server$ nano /ect/apache2/ports.conf

Let’s make it listen to that second port mentioned. Inside the ports.conf add this parameter
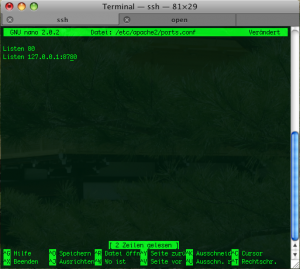
  • Listen 127.0.0.1:8780

By now you might guess what this configuration targets at. It creates a listen port for apache on our beloved port 8780 but only for network cards that have the IP address 127.0.0.1. Means in case our firewall would go down and port scanning would give results, there wouldn’t be any results from port 8780…

After that we simply restart our Apache via:

  • server$ /ect/init.d/apache2 restart

VI. Setting up SSH tunnel for http connection

Ok now we almost made it. For security precautions and for server performance reasons it makes sense to not use VNC connections all the time, although it works. But as it is more comfy to edit phpMyAdmin on your local client machine, we simply set up an SSH tunnel thru our server’s firewall and let it forward http from within the server to our local machine.

This can simply be done by entering this on your client’s terminal:

  • client$ ssh -f -N -L 8780:localhost:8780 root@yourdomain.net -p 8722

Congratulations, you’re almost done. You can now start a webbrowser of your choice and let it point to:

  • http://localhost:8780/my-pma-is-not-accessible

et voilà, you’re smack in your phpMyAdmin interface.
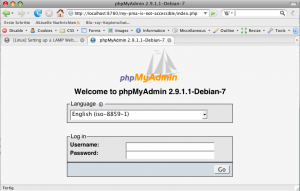
Killing your tunnel (and all other running SSH connections) can be done by simply entering on your client machine:

  • client$ killall ssh

VII. Conclusions

We hope you had some fun by conquering this learning curve. There are several points that we only touched on. We might consider applying other security features like faked error reports. We will deal with those faked error reports (means returning a 404 instead of 403) and comprehensive security techniques in forthcoming articles, because this would have lead us here astray.

If you found this article helpful: why not considering our sponsor’s offers? Thanks for re-enacting and now for something completely different: our sponsor …

[Linux] Installing a Firewall (Firestarter) via VNC on Debian

“and first for something complete different”: Muzaq… coding or administrating system can’t do without gooood muzaq. Check our latest tunes here :-)

In our Linux Debian section the following articles have been published during the last weeks:

  • How to secure your Debian server by changing the SSH port number (read tutorial here)
  • How to secure your Debian server by setting up SSH for passwordless login via public- and private-key cryptography (read tutorial here)
  • How to secure your Debian server by updating the buggy openSSH Debian package (read tutorial here)
  • How to simplify Debian administration by setting up a graphical interface (GNOME) to be used via VNC connection thru an SSH tunnel (read tutorial here)

I. Abstract

In this (very short) howto, we’re gonna setup a firewall with a graphical user interface (GUI) for GNOME. This firewall is called Firestarter. Our goal is to further improve safety of our server. We’re gonna do that on a Debian Etch system.

II. Requirements

Hic at nunc, we need to have a running VNC connection (read tutorial here) to our Debian server, because dumbed down: Firestarter is a nice (GNOME) GUI for Nefilter/IPTables (further details here).

III. Installation

Hic et nunc, we follow Kant’s question “What shall I do?”. We assume you logged into your server as root using VNC and opened a terminal. Do the following:

  • server$ apt-get install firestarter
    (installs the firewall)
  • server$ firestarter
    (starts firestarter for first configuration)

IV. Configuration

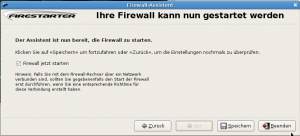
Firestarter auto recognizes your network card and device id (for example eth0 or venet0). Follow the wizard and click Save and Exit then (here because of german screen shots: Speichern und Beenden).


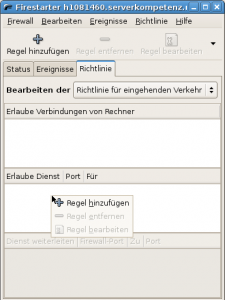
Then the main Firestarter window will open. Since we want to come back later on after having logged out of our server, we have to open at least one port for our VNC through SSH tunnel. Go to register Rules (here because of german screen shots: Richtlinie)

And add a rule (here because of german screenshots: Regel hinzufügen) for your specific ports.

V. Which ports

The following list is only an example you know best which services your server runs.

  • the normal VNC port will be 5901 or 5900 – since VNC communication is not encrypted on that port, we strongly recommend to only use a SSH tunnel for VNC sessions.
  • in case you followed our recommendation to use an SSH tunneled VNC connection you only need to open port 22, port 5901 or 5900 is not necessary
  • in case you followed even our recommendations to change your SSH port number to somewhat different, open that port instead (you may have a look at your /etc/ssh/sshd_config if you forgot the port number)
  • if you’re running an apache with a website, you probably need port 80, aswell

VI. Activate new rules

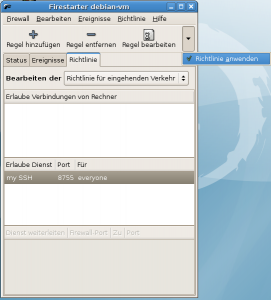
  • click on Apply Rule rule (here because of german screenshots: Richtlinie anwenden)

VII. Testing

Stay logged and open a second terminal and try to log in, if everything works you’re done. Thanks for your attention.

If this article helped you, please click our sponsor (Google-Adsense) and help us maintaining this project free. Thanks…

[Linux] Setting Up a Debian VNC Server (via SSH tunnel)

“and first for something complete different”: Muzaq… coding or administrating system can’t do without gooood muzaq. Check our latest tunes here ;-)

I. Abstract

No doubt, configuring a web server won’t work without being in the know of basics about the terminal, vim or nano. Anyway many tasks can also be performed by administrating a server using a GUI. The problem is: only Windows 2003 or Windows 2008 come with a preinstalled remote desktop connection – and they are really much more expensive than Linux solutions. When using our beloved and most stable Linux distribution Debian, it mostly comes preinstalled with almost nothing.

The following article assumes, you have a server, which can be managed via ssh rather than by physically access. We will show you how to setup a GNOME desktop on that server and virtually connect to that desktop using an SSH tunnel.

In case you are running a client machine with:

  • Linux or Mac OS X, just keep on reading, all tools come onboard
  • MS Windows, please install Cygwin with the openSSH package first
    (Note: you may also use the Putty/Pageant combo instead, but this will require some different steps. The following article is straightened to using Cygwin, because we feel it’s got several client sided advantages in contrast to Putty)

II. Preparations

First of all: log into your server via SSH as root. Make sure openSSH has been updated, a serious security flaw has been discovered some days ago concerning Debian based Linux distros. Make also sure you have secured your SSH access. We really recommend public-, private-key crypto for ssh login.

III. Update and Upgrade your server with current packages

Being logged into your server as root, do the following:

  • server$ apt-get update
  • server$ apt-get upgrade
  • server$ apt-get dist-upgrade

to upgade your whole installation.

IV. Installing GNOME

After having done a dist-upgrade we are used to reboot the servers. This might not be necessary in all cases and might be a strange obsession from ancient MS Windows times, but we would recommend it to allow all scripts to become initialized anew.

After reboot login as root again and do the following:

  • server$ apt-get install gnome-desktop-environment

V. Install fonts for GNOME and VNC

Install some (required) fonts for the VNC server GNOME session:

  • server$ apt-get install xfonts-100dpi
  • server$ apt-get install xfonts-100dpi-transcoded
  • server$ apt-get install xfonts-75dpi
  • server$ apt-get install xfonts-75dpi-transcoded
  • server$ apt-get install xfonts-base

VI. Install VNC server

We prefer TightVNCServer, simply because it worked from the very beginning…

  • server$ apt-get install tightvncserver
    (installs TightVNCServer)
  • server$ tightvncserver :1
    (initialize the VNC server for the first time, it will copy some files to ~/.vnc folder and it will ask twice for a VNC password – we recommend to provide it for your own safety)
  • server$ tightvncserver -kill :1
    (stop VNC server – for further configuration purposes)

VII. Configure VNC server

In this example we’re gonna use nano, you can also use vim, vi or whatever you think what editor fits your needs best:

  • server$ nano ~/.vnc/xstartup

We need to change the standard X-Windows interface, since we like to use GNOME.

Original xstartup file:

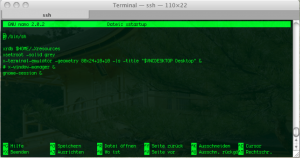
  • #!/bin/shxrdb $HOME/.Xresources
    xsetroot -solid grey
    x-terminal-emulator -geometry 80x24+10+10 -ls -title "$VNCDESKTOP Desktop" &
    x-window-manager &

Change this to

  • #!/bin/shxrdb $HOME/.Xresources
    xsetroot -solid grey
    x-terminal-emulator -geometry 80x24+10+10 -ls -title "$VNCDESKTOP Desktop" &
    # x-window-manager &

    gnome-session &

Save and exit nano (ctrl + x).

VIII. Setup an SSH tunnel for VNC connections

VNC connections are usually to be found on port 5901. Usually they are not encrypted on that port. That means you send the VNC password unencrypted thru the net to that port. Since this allows too many attacks, it is just too weak for a web server solution.

We don’t want to provide possible Zombies. So the solution is: we just setup an SSH tunnel as a wrapper for our VNC connection. Further information about SSH tunneling can be found here and here.

On your client machine do the following:

  • client$ ssh -f -N -L 5901:localhost:5901 root@yourserver.net

In case you changed the ssh port on your server (like we recommended in our article here), you need to specify your ssh port for the SSH tunneling aswell, like:

  • client$ ssh -f -N -L 5901:localhost:5901 root@yourserver.net -p 8722
    (in this case we use port 8722 instead of the standard port 22)

IX. Connect to your server via VNC

Start tightvnc on your server:

  • server$ tightvncserver :1

In case you like to have a different screen resolution than 1024×768 you may start tightvnc with:

  • server$ tightvncserver -geometry 1280x1024 :1

On a Mac the VNC client is called Chicken of the VNC (Download here). On Windows you can use RealVNC (Download here). Both work quite similar and contain almost the same features.

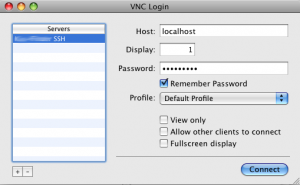
Use the VNC client (like Chicken of the VNC) to connect to your SSH tunnel,

  • connect to localhost (or 127.0.0.1)
  • display 1, because of port 5901 (display 0 would be port 5900)
  • enter your VNC password
    (the password, that has been setup in step VI. Install VNC server)


  • hit connect and
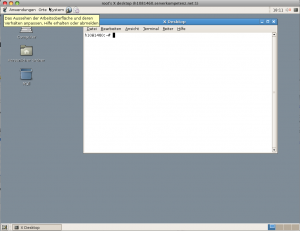
  • you should see something like that (on vservers the performance may be kinda slow and GNOME’s GUI may take some time to initialize).

Congratulations, you’re done.

X. Stopping VNC session and SSH tunneling

You can simply quit the VNC session by just closing your VNC client. But the SSH tunnel from your client to your server will still be up until you stop it (means until you kill it). We may provide a simple script to do that when we finished cleaning it up. Right now it is kinda spaghetti code. Although this is not too comfy, you may live with a simple command until then:

  • client$ killall ssh

It simply kills every SSH process :-)

XI. Final words

We hope you enjoyed our trip into the amazing VNC worlds on Debian and also hope you learned something. You could now setup a firewall like firestarter, which is GUI driven. We will publish some words about this in the early future.

And of course, you are still invited to consider our sponsor (Google-Adsense) and help us maintaining this project here free. Thanks…

[Stories] PC Welt irritiert

I. Zusammenfassung

Erfahrungsberichte mit eigenartigen Zeitgenossen pflastern unser aller Wege. Diesmal hatte ich die “Freude”, mich mit den Kollegen von der PC Welt – einer von mir eigentlich respektierten Computerzeitschrift – auseinandersetzen zu dürfen.

Nachdem bei einem Freund diverse Computerteile gestohlen (siehe hier) wurden, habe ich in den einschlägigen Foren dieses deutschen Internet-Universums einige Warnmeldungen angebracht. Eben auch im Kleinanzeigen Forum der PC Welt.

II. PC Welt mag keine Diebstahlwarnungen

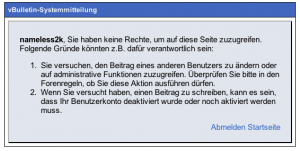
Mit einiger Verwunderung musste ich nur wenige Stunden später feststellen, dass meine Warnmeldung von einem Moderator entfernt wurde – ohne jegliche Mitteilung, weshalb.

III. Das Löschen der Warnung – nur ein Versehen des Moderators?

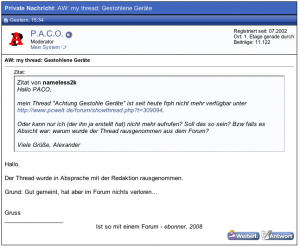
Auf meine Nachfrage, ob es sich hierbei um ein Versehen handelte, schließlich dient eine solche Sicherheitswarnung auch dem Schutz anderer Usern im PC Welt Forum, versuchte sich Moderator P.A.C.O. in einer Rechtfertigung – ohne jegliche Aussage, wie man unschwer erkennen kann:

Hallo.

Der Thread wurde in Absprache mit der Redaktion rausgenommen.

Grund: Gut gemeint, hat aber im Forum nichts verloren…

Gruss

Wie…? Eine Warnung vor gestohlenen Gegenständen, die mit großer Sicherheit in den Kleinanzeigenmärkten dieses Landes auftauchen werden, hat hier nichts verloren? Nichts?

Nein nichts! Richtig gelesen. Falls über Ihren Köpfen nun ebenfalls diese vielen kleinen Fragezeichen (über das Verhalten von Menschen im Allgemeinen und von Moderatoren im Besonderen) schweben sollten: Sie sind nicht allein.

Ohne einen kurzen Exkurs in die Textexegese der neunten Klasse vorzunehmen, ist wohl recht selbstevident, dass diese vermeintlich als Begründung getarnte Antwort gar keine solche ist. Erstens: sie inhaltlich ungefähr völliger Nonsens – “hat im Forum nichts verloren”, ist einfach zu wenig – selbst für die neunte Klasse. Zweitens: auch die Aussage, dass das in Absprache mit der Redaktion geschehen ist, begründet rein gar nichts.

IV. Das Löschen der Warnung – nur ein Missverständnis zwischen Moderator und Redaktion?

Unbefriedigt von den Unterprimaner Antworten des Moderators P.A.C.O. wendete ich mich direkt an die Redaktion in der Vermutung, dass hier tatsächlich ein Missverständnis vorliegt zwischen Foren Moderation und Redaktion. Schließlich dient eine solche Warnung vor gestohlenen Geräten ja nun einmal allen Usern. Auf meine Anfrage:

Sehr geehrte Damen und Herren,

unter dem o.a. Link hatte ich vorgestern einige Geräte aufgelistet, die am vergangenen Wochenende bei einem Einbruch in Berlin-Charlottenburg gestohlen wurden. Moderator PACO hat aus mir nicht nachvollziebaren Gründen gelöscht. Mein Eintrag erfolgte aus zwei Gründen: erstens möchte ich den Wiederverkaufswert für die uns gestohlenen Geräte senken und zweitens Kleinkunden bewahren, gestohlene Geräte zu erwerben. Zumal PC Welt ein recht großes Angebotsforum hat. Der Moderator PACO berichtet mir nun auf meine Nachfrage, weshalb der Eintrag gelöscht wurde:

| Hallo.
| Der Thread wurde in Absprache mit
| der Redaktion rausgenommen.
| Grund: Gut gemeint, hat aber im
| Forum nichts verloren…
|
| Gruss

Liegt hier ein Missverständnis vor, dass die Warnung vor Betrügern oder Diebesware nicht in das Forum gehört? Über eine Antwort würde ich mich sehr freuen. Zumal der Diebstahl erst einige Tage her ist und die Geräte nun wohl irgendwo auftauchen werden.

erhielt ich heute eine Antwort, die doch eher an den Grundfesten der Redaktion der PC Welt zweifeln lassen dürfen. H. Meironk war in P.A.C.O. ähnlicher Art bemüht zu versuchen, mir – unter Verwendung von Begriffen, deren Orthographie offensichtlich nicht mit dem Duden abgestimmt wurde – zu erklären, warum hier gelöscht wurde.

Sehr geehrter Herr Schulz,

vielen Dank für Ihre Mail an unsere Redaktion.
Der Thenor ist korrekt. Es sind IT- und Technikforen. Natürlich gibt es auch Schnittpunkte zu Ihrem Anliegen. Jedoch liegt hierbei nicht unser Focus.
Auch mögliche Ansätze, Vertriebswege für die von Ihnen abhanden gekommene Ware, über uns aufzudecken, ist eher gering und sehen wir hier nicht.

Wir bitten für unsere Entscheidung um Verständnis und hoffen, dass der Diebstahl Ihrer Wertgegenstände erfolgreich durch die Polizei aufgeklärt werden kann.

Mit freundlichen Grüßen

H. Meironk
Redaktionsassistenz PC-WELT

V. Fazit

Die Polizei wird unter diesen Umständen wohl mit Sicherheit aufklären, bei so viel Hilfe von den Stellen, über die gebrauchte Geräte gehandelt werden. Is klar, ne?

Gruß in die Parallel (PC) Welt und gute Nacht in München, ruft es aus Berlin…