“and first for something complete different”: Muzaq… coding or administrating system can’t do without gooood muzaq. Check our latest tunes here ;-)
I. Abstract
No doubt, configuring a web server won’t work without being in the know of basics about the terminal, vim or nano. Anyway many tasks can also be performed by administrating a server using a GUI. The problem is: only Windows 2003 or Windows 2008 come with a preinstalled remote desktop connection – and they are really much more expensive than Linux solutions. When using our beloved and most stable Linux distribution Debian, it mostly comes preinstalled with almost nothing.
The following article assumes, you have a server, which can be managed via ssh rather than by physically access. We will show you how to setup a GNOME desktop on that server and virtually connect to that desktop using an SSH tunnel.
In case you are running a client machine with:
- Linux or Mac OS X, just keep on reading, all tools come onboard
- MS Windows, please install Cygwin with the openSSH package first
(Note: you may also use the Putty/Pageant combo instead, but this will require some different steps. The following article is straightened to using Cygwin, because we feel it’s got several client sided advantages in contrast to Putty)
II. Preparations
First of all: log into your server via SSH as root. Make sure openSSH has been updated, a serious security flaw has been discovered some days ago concerning Debian based Linux distros. Make also sure you have secured your SSH access. We really recommend public-, private-key crypto for ssh login.
III. Update and Upgrade your server with current packages
Being logged into your server as root, do the following:
server$ apt-get updateserver$ apt-get upgradeserver$ apt-get dist-upgrade
to upgade your whole installation.
IV. Installing GNOME
After having done a dist-upgrade we are used to reboot the servers. This might not be necessary in all cases and might be a strange obsession from ancient MS Windows times, but we would recommend it to allow all scripts to become initialized anew.
After reboot login as root again and do the following:
server$ apt-get install gnome-desktop-environment
V. Install fonts for GNOME and VNC
Install some (required) fonts for the VNC server GNOME session:
server$ apt-get install xfonts-100dpiserver$ apt-get install xfonts-100dpi-transcodedserver$ apt-get install xfonts-75dpiserver$ apt-get install xfonts-75dpi-transcodedserver$ apt-get install xfonts-base
VI. Install VNC server
We prefer TightVNCServer, simply because it worked from the very beginning…
server$ apt-get install tightvncserver
(installs TightVNCServer)server$ tightvncserver :1
(initialize the VNC server for the first time, it will copy some files to ~/.vnc folder and it will ask twice for a VNC password – we recommend to provide it for your own safety)server$ tightvncserver -kill :1
(stop VNC server – for further configuration purposes)
VII. Configure VNC server
In this example we’re gonna use nano, you can also use vim, vi or whatever you think what editor fits your needs best:
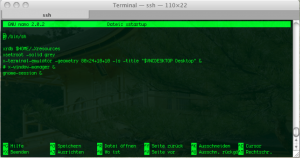
server$ nano ~/.vnc/xstartup
We need to change the standard X-Windows interface, since we like to use GNOME.
Original xstartup file:
#!/bin/shxrdb $HOME/.Xresources
xsetroot -solid grey
x-terminal-emulator -geometry 80x24+10+10 -ls -title "$VNCDESKTOP Desktop" &
x-window-manager &
Change this to
#!/bin/shxrdb $HOME/.Xresources
xsetroot -solid grey
x-terminal-emulator -geometry 80x24+10+10 -ls -title "$VNCDESKTOP Desktop" &
# x-window-manager &
gnome-session &
Save and exit nano (ctrl + x).
VIII. Setup an SSH tunnel for VNC connections
VNC connections are usually to be found on port 5901. Usually they are not encrypted on that port. That means you send the VNC password unencrypted thru the net to that port. Since this allows too many attacks, it is just too weak for a web server solution.
We don’t want to provide possible Zombies. So the solution is: we just setup an SSH tunnel as a wrapper for our VNC connection. Further information about SSH tunneling can be found here and here.
On your client machine do the following:
client$ ssh -f -N -L 5901:localhost:5901 root@yourserver.net
In case you changed the ssh port on your server (like we recommended in our article here), you need to specify your ssh port for the SSH tunneling aswell, like:
client$ ssh -f -N -L 5901:localhost:5901 root@yourserver.net -p 8722
(in this case we use port 8722 instead of the standard port 22)
IX. Connect to your server via VNC
Start tightvnc on your server:
server$ tightvncserver :1
In case you like to have a different screen resolution than 1024×768 you may start tightvnc with:
server$ tightvncserver -geometry 1280x1024 :1
On a Mac the VNC client is called Chicken of the VNC (Download here). On Windows you can use RealVNC (Download here). Both work quite similar and contain almost the same features.
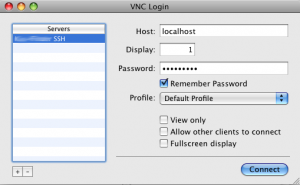
Use the VNC client (like Chicken of the VNC) to connect to your SSH tunnel,
- connect to localhost (or 127.0.0.1)
- display 1, because of port 5901 (display 0 would be port 5900)
- enter your VNC password
(the password, that has been setup in step VI. Install VNC server)
- hit
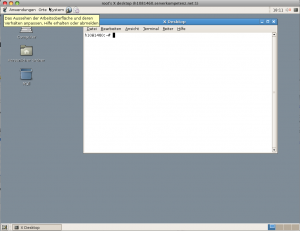
connectand - you should see something like that (on vservers the performance may be kinda slow and GNOME’s GUI may take some time to initialize).
Congratulations, you’re done.
X. Stopping VNC session and SSH tunneling
You can simply quit the VNC session by just closing your VNC client. But the SSH tunnel from your client to your server will still be up until you stop it (means until you kill it). We may provide a simple script to do that when we finished cleaning it up. Right now it is kinda spaghetti code. Although this is not too comfy, you may live with a simple command until then:
client$killall ssh
It simply kills every SSH process :-)
XI. Final words
We hope you enjoyed our trip into the amazing VNC worlds on Debian and also hope you learned something. You could now setup a firewall like firestarter, which is GUI driven. We will publish some words about this in the early future.
And of course, you are still invited to consider our sponsor (Google-Adsense) and help us maintaining this project here free. Thanks…


 It has been found by