Category Archives: Labs

[OSX86] Switcher’s Hints 1001: Change File Associations

english

deutschsprachige Version: hier klicken

All of us know how to change the standard file associations in Microsoft Windows, but recently we switched to a Mac and Boom – everything is almost the same, but there are minor to major differences. Like changing the program to open a specific file type (like Adobe’s Portable Document Format or Microsoft’s Audio-Video-Interleave) by default. In general this is task is performed like under good old Windows. OS X looks for the file suffix (extension) and then checks which program is associated to this specific file extension. For instance .pdf (Adobe’s Portable Document Format) by default is opened with the preview.app.

To change file associations just do the following:

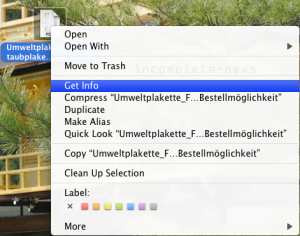
  1. right click on a file that has the extension you wanna associate to another program
  2. you will see almost this picture:
  3. then click on Get Information
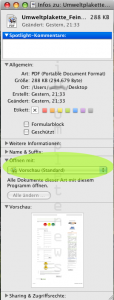
  4. A new window will pop up (see picture)
    chng_file_assoc02ed1
  5. you can change the Open with options and also force to open all documents of this type with this program

Enjoy

deutsch

Wir alle wissen, wie man eine Dateityp-Verknüpfung unter Microsoft Windows ändert, aber da wir erst kürzlich auf einen Mac umgestiegen sind, macht es nun Boom – es sieht zwar alles recht ähnlich aus, aber es kleinere und größere Unterschiede. Und dazu gehört das Ändern der Standard Datei Verknüpfung (z.B. das Öffnen von Adobes Portable Document Format oder auch Microsofts Audio-Video-Interleave) eben auch.

Grundsätzlich läuft das Prozedere aber ab wie unter Windows. OS X schaut sich die Dateiendung an (Dateiextension) und prüft dann, mit welchem Programm Dateien dieses Typs geöffnet werden sollen. Zum Beispiel wird der Dateityp .pdf (Adobe’s Portable Document Format) standardmäßig mit der preview.app geöffnet.

Um diese Dateiverknüpfung zu ändern, müssen Sie einfach Folgendes tun:

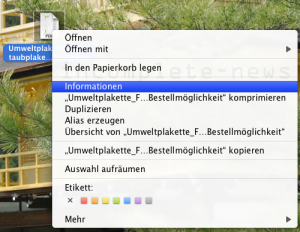
  1. rechter Mausklick auf die Datei, deren Endung sie generisch von nun an mit einem anderen Programm öffnen lassen wollen
  2. Sie sehen dann in etwa dieses Bild
    chng_file_assoc01ed
  3. dann klicken Sie auf Informationen
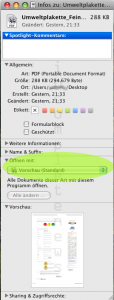
  4. Es erscheint das nächste Bild:
    chng_file_assoc02ed
  5. in diesem Fenster können Sie nun Öffnen mit ändern und auch erzwingen, dass alle Dateien diesen Typs mit diesem Programm geöffnet werden sollen

Enjoy

[iPhone] Mobile optimized Pages…

english

deutsche Übersetzung bitte hier klicken…

Yes, we know, the iPhone’s Safari can interprete and display normal internet webpages (if they don’t use Adobe Flash, though). Anyway, being on the road and having to use EDGE/GPRS based internet, the loading times just take long, if not even too long. So we decided to put together a list of pages of free sites that load faster, since they are yet optimized for mobile devices. And yes: this site will be available mobile optimized aswell, but it will take some time and please don’t ask for timelines…

Category Language Name Address
News Deutsch Der Spiegel http://m.spiegel.de
News English Time Magazine http://www.time.com/time/mobile/
News deutsch Wirtschaftswoche http://mobil.wiwo.de/
News English Financial Times (UK) http://m.ft.com/
News Deutsch Financial Times (Ger) http://mobil.ftd.de/
News Deutsch N-TV http://mobil.n-tv.de/
News Deutsch Frankfurter Allgemeine Zeitung (FAZ) http://m.faz.net/
News Deutsch Die Zeit http://mobil.zeit.de/
News Deutsch Süddeutsche Zeitung http://mobil.sueddeutsche.de/
Tech News Deutsch Golem Ticker http://golem.mobi/
Tech News English Slashdot http://slashdot.org/palm
Tech News Deutsch Heise Newsticker http://www.heise.de/mobil/newsticker/
Social Network Deutsch XING http://mobile.xing.com
Social Network English LinkedIn http://m.linkedin.com
Lexicon multi-lang Wikipedia http://wikipedia.7val.com
Dictionaries multi-lang Leo http://pda.leo.org

To be continued…

deutsch

Ja sicher, der iPhone Safari-Browser ist imstande normale Internetseiten zu interpretieren und anzuzeigen. (sofern sie nicht Adobe Flash verwendet). Leider nur stellt sich schnell Ernüchterung ein, wenn man unterwegs ist und auf EDGE/GPRS angewiesen ist, die Ladezeiten für normale Internetseiten sind einfach nur im Notfall akzeptabel. Wir haben aus diesem Grund, eine Liste kostenfreier Internetseiten zusammengestellt, die optimiert sind für mobile Endgeräte und deshalb auch erheblich schneller laden. Und ja: auch diese Seite beschäftigt sich mit der Umsetzung eines mobil optimierten Frontends, aber das wird noch ein wenig Zeit kosten, also bitte erstmal keine Rückfragen dazu. Wenn Sie weitere kostenfreie Seiten kennen, die hier unbedingt gelistet werden müssen, freuen wir uns sehr über Kommentare…

[MacOS] Scrolling your MacBook like iPhone

english

The two finger scrolling in OS X is just fantastic. I would never like to miss it ever again. Always when I use a normal PC Laptop I wonder why two finger scrolling doesn’t work. I wonder how long it takes for the other Laptop manufacturers to copy that feature and integrate in their systems.

Anyway in addition to the two finger scrolling Marc Moini wrote an extension that enables scrolling like iPhone scrolling. The program is called Smart Scroll X and was first released long before the iPhone premiere.  Means: the scrolling feature wasn’t stolen from the iPhone, rather than the other way round. It really makes fun to use it scrolling in Firefox or anything else. The only bad thing is: Smart Scroll costs about US$ 20…

» Download SmartScroll here

smsc logo picture

[iPhone] HowTo Activate and Unlock your iPhone using Pwnage

english

Update July 20th, 2008: Pwnage Tool 2.0 has been released. Read our tutorial here.

Read german version below!
Deutsche Übersetzung hier entlang

Ok it is time to do it. The elite is talking about it, so we’re gonna do it, pwn our iPhones and show you (hopefully) some hints you can’t read anywhere else.

  1. Preparations for this tutorial
  2. Getting ready
    • Unpack and install Pwnage Tool to your Applications folder, yes ;-)
    • Copy iPhone restore firmware 1.1.4 to your desktop
    • Unpack downloaded bootloaders and copy them to your desktop
  3. Let Pwnage rock
    • start Pwnage (accept the question, if you really wanna start that app that you just downloaded from the net. As long as you loaded it from the location I provided above everything should be all right)
    • click Browse .ipsw (click to enlarge picture)
      Choose ipsw Firmware
    • Pwnage will give you a status report looking like this (click picture to enlarge)
      status report
    • bring your iPhone into restore mode: plug the iPhone into the docking station (which is of course connected to your Mac), hold power-buttom (at the top) and the round button with the printed square (bottom, below the touch screen), keep holding until screen turns black (off) and on again – showing the Apple logo then, then release the power-button, but keep on holding the round buttron for some more seconds (maybe 10 or more). The restore mode picture will appear (click picture to enlarge)
      restoreimg
    • back in your Pwnage Tool click on iPwner, Pwnage Tool will report, that your iPhone is beeing pwned now. On the screen of your iPhone there will be loads of lines of commands running thru.
    • in the end your iPhone is gonna be rebooted
    • Congratulations: your iPhone has been Pwned
    • Now you only need to compose a custom iPhone Firmware (see the next steps)
  4. Compose a custom .ipsw file
    • back in your Pwnage Tool click on IPSW Builder
    • choose: “Enable baseband update, Neuter bootloader, Unlock baseband, Activate phone and if you like: Use DevTeam custom pictures” (click picture to enlarge)
      step2.1
    • click ok
    • you then have to locate the bootloaders (click picture to enlarge)
      Step2.2
    • locate the bootloaders (you should have copied them to your desktop!)
    • and click ok.
    • save the whole custom .ipsw to your desktop
    • during processing the .ipsw Pwnage may ask you for your administrator's password
    • when everything went correctly you will see this picture (click to enlarge)
    • Congratulations: you just composed your first customized iPhone firmware
    • Now you only need to let iTunes restore your customized iPhone firmware
  5. Restore our custom .ipsw thru iTunes :-)
    • start iTunes
    • mark your iPhone in iTunes and
    • hold alt key and choose restore, the following file dialog will appear
      Step 3.1
    • choose your custom firmware
    • and it will start “extracting the firmware“, “Preparing iPhone for restore” and “Restoring iPhone Software” – this will take some minutes
    • when you face error 1602, please update iTunes to the most current version and try again (we used version 7.6.2)
    • when finished your iPhone restarts
    • after restart the Bootneuter application automatically starts and unlocks your baseband (click picture to enlarge)

    • et voila: you’re done
  6. Final Steps
    • install BSD subsystem (we did not test Pwnage with Telesphoreo/Cydia yet!! Will add info about this soon!)
    • install OpenSSH
    • repair your EDGE settings (read here)
  7. Reported Issues
    • mail.app crashes and brings you back to springboard: don’t restore your backupped settings, after pwning set the iPhone as a new iPhone (Problem originally reported here)

Say thanks to the iPhone Dev Team. This is standing work!!

We’d be glad to read your feedback about this “how to”: here in the comments (scroll down) or in this hackin0sh thread (link)

[ID109] Was the information provided above helpful for you?

View Results

Loading ... Loading ...

Deutsch

Ok Leute, es ist Zeit, das Ding zu rocken. Die Elite spricht drüber, also schauen wir uns das mal genauer an. Im Folgenden findet Ihr ein HowTo, das hoffentlich Hinweise enthält, die Ihr woanders so nicht lesen könnt

  1. Vorbereitungen
    • Ihr braucht einen Mac oder einen HackMac zur Hand, weil derzeit noch keine Windows Version von Pwnage veröffentlicht wurde.
    • Download Pwnage Tool 1.0 hier (Mac version, 22MB)..
    • Download iPhone Restore Firmware 1.1.4 hier (original Apple Server, 162 MB)…
    • Download Bootloaders (Google Suche nach iPhone bootloaders.rar). Andere Seiten verlinken die Bootloader direkt, wir werden dies aus nachvollziehbaren Gründen nicht tun…
    • Macht Backups Eurer Daten, also verbindet das iPhone mit iTunes und synchronisiert Adressen, den Kalender, die Photos, Eure Voicerecordings und so weiter.
  2. In die Startlöcher
    • Pwnage Tool dekomprimieren und in Euer Programme Verzeichnis installieren
    • Kopiert die iPhone Restore Firmware 1.1.4 auf Euren Schreibtisch
    • Dekomprimiert die heruntergeladenen Bootloader und kopiert sie ebenfalls auf Euren Schreibtisch
  3. Zeit für einen Tanz mit Pwnage
    • startet Pwnage (die Sicherheitsfrage, ob Ihr wirklich Pwnage starten wollt, müsst Ihr akzeptieren)
    • Klickt Browse .ipsw (zum Vergrößern auf das Bild klicken)
      Choose ipsw Firmware
    • Pwnage meldet einen Statusbericht, der ähnlich aussehen wird, wie der Folgende (zum Vergrößern auf das Bild klicken):
      status report
    • danach bringt Euer iPhone in den Restore-Modus: steckt das iPhone in die Dockingstation (die selbstverständlich mit Eurem Mac verbunden ist!), haltet den Power-Knopf (ganz oben) und den runden Knopf mit dem aufgedruckten Quadrat (der unter dem Touch-Screen), haltet die beiden Knöpfe solange, bis der Bildschirm schwarz wird (sich also ausschaltet) und wieder angeht und dabei das Apple Logo zeigt. Dann lasst Ihr den Power-Knopf bitte los und haltet nur noch den runden Knopf für einige weitere Sekunden. Wenn das Restore-Modus Bild erscheint, ist alles richtig gelaufen (zum Vergrößern auf das Bild klicken)
      restoreimg
    • zurück im Pwnage Tool klickt auf den iPwner-Knopf
    • das Pwnage Tool meldet dann, dass Euer iPhone nun ge-pwnt wird. Auf dem Bildschirm des iPhones werden einige Zeilen mit Befehlen durchlaufen.
    • wenn der Prozess sauber durchgelaufen ist, wird das iPhone neugebootet
    • Gratulation Euer iPhone ist nun PWNed
    • nun müsst Ihr noch eine eigene Firmware einspielen, die die Aktivierung und den Unlock vornimmt
  4. Eine angepasste .ipsw Firmware erstellen
    • zurück im Pwnage Tool klick Ihr nun auf IPSW Builder
    • wählt: “Enable baseband update, Neuter bootloader, Unlock baseband, Activate phone” und wenn Ihr wollt: “Use DevTeam custom pictures“, uns hat die angebissene Ananas nicht so recht gefallen (zum Vergrößern auf das Bild klicken)
      step2.1
    • dann auf OK klicken
    • und nun die auf Euren Schreibtisch kopierten Bootloader auswählen (zum Vergrößern auf das Bild klicken)
      Step2.2
    • wenn Ihr die Bootloader ausgewählt habt, wieder auf OK klicken
    • danach speichert Ihr das "custom .ipsw" (die angepasste iPhone Firmware) auf Euren Schreibtisch
    • während des Erstellens der .ipsw Firmware fragt Pwnage nach Eurem Administrator Passwort, gebt es an, sonst geht es nicht weiter
    • Ihr solltet nun etwa das folgende Bild sehen (zum Vergrößern auf das Bild klicken)
    • Gratulation Ihr habe Eure erste eigene iPhone Firmware erstellt
    • Nun müsst Ihr diese Firmware nur noch mittels iTunes ins iPhone “wiederherstellen” lassen :-)
  5. Einspielen (Wiederherstellen) der angepassten .ipsw Firmware mittels iTunes :-)
    • startet iTunes
    • markiert Eurer iPhone in iTunes und
    • haltet die alt Taste gedrückt und wählt wiederherstellen aus
    • es erscheint der folgende Datei-Dialog
      Step 3.1
    • hier wählt Ihr nun die eigens erstellte (custom .ipsw) Firmware aus.
    • iTunes wird beginnen, die Firmware zu extrahieren, das iPhone für die Wiederherstellung vorzubereiten und die iPhone Software wiederherzustellen
    • dieser Prozess wird einige Minuten in Anspruch nehmen
    • Falls Ihr dem Fehler (error) 1602 begegnen solltet, aktualisiert iTunes auf die aktuellste Version (wir haben Version 7.6.2 verwendet)
    • Nach dem Neustart des iPhones wird automatisch der Bootneuter gestartet, der Euer Baseband unlockt (zum Vergrößern auf das Bild klicken)

    • tadada: Ihr habt es geschafft, ein vollständige gePWNtes iPhone
  6. Abschließende Arbeiten
    • installiert das BSD subsystem (wir haben Pwnage noch nicht mit Telesphoreo/Cydia getestet!! Wir ergänzen das, wenn wir den Test durchgeführt haben!)
    • installiert OpenSSH
    • repariert Eure EDGE Einstellungen (hier nachzulesen)
  7. Berichtete Probleme
    • mail.app stürzt ab. Versucht, Eure gesicherten Daten nicht wiederherzustellen, sondern das iPhone als ein neues iPhone in iTunes einzustellen (Problem wurde hier berichtet)

Ein großen Dank solltet Ihr nun an das iPhone Dev Team richten. Die Arbeit von den Jungs ist einzigartig!!!

Über Feedback zu diesem Tutorial sind wir natürlich dankbar. Entweder unten als Kommentar (deutsch oder english) oder in diesem hackin0sh Thread (bitte nur in englisch).

Search Terms: deutsches HowTo, How To, german, Tutorial, Tut

[ID109b] War das HowTo hilfreich für Euch?

View Results

Loading ... Loading ...

[MacOS] Flags and Parameters for OSX86’s Darwin Bootloader

This is for the matter of completeness of my own records. You will find this on many places on the net, prolly not that well documented ;-) Anyway, the following flags and parameters may be put into Darwin before bootprocess:

flag / parameter meaning
-f Force rebuild extensions cache
-v Verbose booting shows debug information
-s Boots into single user mode (means only terminal based mode)
-x Boots into safe mode
-legacy Boots into 32bit instead of 64bit mode
“rd=disk0s1” Force to boot a specific partition on a specific drive (BSD drive notation, means disk0 = physical disk 1). Here disk1 partition 1 is forced to be booted.
“Graphics Mode=1024x768x32@75” Forces to boot with a resolution of 1024 x 768 with 32bit colors at 75Hz
“Kernel=mach_kernel” Forces to load a specific kernel, helpful for testing of new kernels.
“cpus=1” Force using only 1 CPU core, may help addressing issues
“idlehalt=0” May solve stuttering and shuttering on dualcore CPUs
“platform=X86PC” Forces to not use powermanagement (disables ACPI)
“platform=ACPI” Forces to use powermanagement (enables ACPI, but may crash your system)

[MacOS] Update Information about Files and Folders

english

Ever had the situation that you just copied a specific file to a folder but it won’t show up in the finder? Yes? Well more than once should be the typical answer. Don’t let crappy finder decide when to update your view. Just install Rainer Brockerhoff‘s “Nudge” and update the view in the finder whenever you need it.

» Download Nudge here

deutsch

Kennt Ihr diese Situation: Ihr habt gerade eine Datei in ein bestimmtes Verzeichnis kopiert, aber im Finder wird die Datei partout nicht angezeigt? Ja? Vermutlich haben wir alle diese eigenartige Erfahrung mehr als nur einmal bereits gemacht. Lasst nicht den merkwürdigen Finder entscheiden, wann Eure Ansicht aktualisiert wird. Installiert Rainer Brockerhoffs “Nudge” und aktualisiert Eure Ansicht auf Knopfdruck…

» Download Nudge hier

[MacOS] Switching Windows inside of Applications

English

Deutsche Übersetzung weiter unten…

All of us switchers know the situation: rather that switching from one application to another in Microsoft Windows we can switch from every window to another using ALT-TAB. The problem is such behaviour is not known to the Mac world. A major solution for that problem comes from Peter Maurer. He developed a prefpane named Witch, that mimics exactly that behaviour known from the MS-Windows world. Moreover it can maximize minized windows when switching to them. And the best thing is: it is donation ware. Send Peter some Euros or US Dollars, he really deserves it…

» Download Peter Maurer’s Witch here…

Witch PrefPane
Screenshot (click to enlarge)

German

Wir Switcher kennen das folgende Problem genau: Unter Microsoft Windows wechselt man mit ALT-TAB nicht nur zwischen Applikationen, sondern auch zwischen Fenstern einer gleichen Applikation. Eine solche Funktionalität ist der Mac Welt bislang (eigentlich) nicht bekannt. Eine großartige Lösung hat Peter Maurer entwickelt. Er hat eine PrefPane Erweiterung geschrieben, die die aus der MS-Windows Welt bekannten Fenster-Wechseln Eigenschaften durchführen kann. Daneben kann es noch minimierte Fenster bei Anwählen aus dem Dock hervorzaubern. Aber das Beste ist, dass es Donation-Ware is. Schickt also Peter ein paar Eurer Euros oder US Dollars, für das Programm hat er es wirklich verdient…

» Download Peter Maurers Witch hier…

Witch PrefPane
Screenshot

[MacOS] Settings for ASUS P5LD2 VM DH incl. Sleep Mode

So guys you have bought an “ASUS P5LD2 VM DH” motherboard because it was suggested to be working, but something does not work. The following article will show you how to configure the BIOS to make Leopard 10.5.2 working with its vanilla stock kernel. Before starting over please do me the favor and tell me:

Where do you come from?

View Results

Loading ... Loading ...

Thanks for participating. You know what? I’d only buy the “Intel Bad Axe D975XBX” as an alternative to that board but that lacks the possibility to overclock… Ok so how to proceed?

My equipment:

  • ASUS P5LD2 VM DH
  • Intel Core 2 Duo 6300 (2 x 1.8GHz)
  • Sapphire ATI HD 2600 XT (256MB)
  • 2GB memory
  • Samsung 250GB

What to do

I assume you know what to do to get into the BIOS. Automatic hardware recognition is almost perfect with some little additions to make vanilla kernels work.

I use BIOS Firmware revision 0702. If you don’t have that revision yet, do the following:

In BIOS set the following configuration:

  • Menu: Advanced -> CPU Configuration
    • Set Execute Disable Function to ENABLED (see picture)
    • CPU NX
  • Menu: Power (see picture)
    • Set Suspend Mode to AUTO
    • Set Repost Video on S3 Resume to NO
    • Set ACPI 2.0 Support to YES
    • Set ACPI APIC Support to ENABLED
    • Suspend and Sleep Mode

That should do. Save and Exit and install Leopard and become happy. Intel GMA 950 onboard graphics supports sleep mode. But I’d recommend using the “Sapphire ATI HD 2600 XT” (see here, how to install this graphics card). Tell me what your experiences are…

If the above helped you, please visit our sponsor and help us maintaining that site:

[MacOS] Solutions to Issues with Leopard Graphics Update 10.5.2

I got to know this issue for the first time when I installed a clean Leopard 10.5.1 to my HackMac and then upgraded like Netkas recommends. Since I remembered the old Tiger times and my bunch of problems with my x1650 ATI (read some hints for the ATI x1650 here), I decided to reinstall the system from the peek without applying the Graphics Update. And this way it works. The only thing that may happen: as long as you do not install the Graphics Update, further updates may not be shown in the update manager.

Because all that hazzle with the x1650 graphics I had, I decided to get a new card (ATI Radeon 2600HD XT – read how to install it).

Last week I decided to update my MacBook Pro aswell – which was still running on Tiger. See the way I did it here. Ad the funny thing in the end was… Ok I upgraded to 10.5.2, did the reboot thing and did the Graphics Update and… tatatata….

Description of the Issue

My MBP did not show me any login screen anymore. Instead I got a fixed mouse pointer in the upper left and a second mouse pointer that could be moved. But no windows or login possibilities. Before reading on what I did, please do me the favor and tell me:

Where do you come from?

View Results

Loading ... Loading ...

Solving this damn issue manually

I can’t exactly say what those Apple Devs thought by themselves when releasing this Graphics Update but the internet is full of articles where people tell this update f*cked their systems. Ok lets try some things…

  1. turn off your system
  2. turn on and hold the following keys to reset PRAM: "command","option", "P" and "R" (means 'Apple-Key' and 'Alt-Key' and 'p' and 'r')
  3. your system will do the well known startup “boom” sound again and reset itself.
  4. hold the keys until you heard the “boom” sound three times
  5. let the system try to boot
  6. if everything is fine now: open your windows and shout “Thank you Alexander”
  7. if booting still fails shout whatever you feel like
  8. then do the following:
  9. in case you don’t have a second partition with the full installation of Leopard on it, you can now ask yourself why you did not read this article before. Instead get your Leopard DVD at hand and reboot your system holding the “ALT” key and choose to boot from DVD. Those of you who yet have a second partition and followed the guide mentioned above do the same but choose the second partition to boot.
  10. click thru all the messy questions and
  11. start the “Disk Utility” then
  12. choose your harddrive where the screwed Leopard install is on
  13. and click “Repair Disk Permissions
  14. wait forever for this task to complete (in my case it took about 25 minutes, I first thought it hangs but it did not…)
  15. reboot your system
  16. you should be done now

Additional notes:

The steps I performed above are intended to be applied to a system with genuine Apple hardware. This will not work on HackMac systems!!!

[ID67]: Was the information provided above helpful for you?

View Results

Loading ... Loading ...

[MacOS] Install Leopard from .dmg Image to your System

“and first for something complete different”: Muzaq… coding or administrating system can’t do without gooood muzaq. Check our latest tunes here :-)

This time we’re gonna install Leopard from a .dmg image instead from DVD. The purpose is having a repair and recovery system by the hand in case you need it. My story is this: after having had a clean install of Leopard finished and having had applied all the updates, my MBP simply crashed again and again (two mouse pointers error – I found a solution in the meantime: that bug belongs to the Leopard Graphics Update – read it here howto fix it), since at that point I could not fix it, I then decided to reinstall. Something seemed fishy and would hopefully be gone after another fresh install. But as you expect: the same problem occurred again. I then decided to restore my previous tiger install and installed the Leopard DVD to a second partition. This way nothing can stop me, whereever I am, whatever does not work…

Ok what to do now?

I assume

  • You don’t have a bootcamp partition installed
  • means your harddrive is single partitioned
  • You got Tiger installed
  • You know the size of your harddrive (you can also find out in “Disk Utility”)

Now, let the game begin…

    1. Insert Leopard installation DVD into your drive
    2. Start “Disk Utility” to make a .dmg image of your installation DVD (see picture)
    3. click the Mac OS X Install DVD (highlight it) and choose New Image


beforedmg

  1. Choose Read as type of image and name it Mac OS X Install DVD(see picture)

    makedmg

  2. Wait forever (15-20minutes)
  3. Close Diskutility and
  4. Open terminal and enter:
    sudo diskutil resizeVolume disk0s2 139G "HFS+" "LeoInst" 10G
    (in this example the total harddrive size is 149GB = “139G + 10G”)
  5. This command resizes the first partition to 139GB and generates a second partition formated in “HFS+” with size of 10GB. The name of the second partition will be LeoInst (disk0s1 is in this case the EFI partition – see here, what makes the EFI partition so interesting, system partition starts at disk0s2 – that’s the partition we’re gonna resize and split into disk0s2 and disk0s3)
  6. After having executed this command successfully you need to reboot
  7. After reboot open “Disk Utility” again
  8. You should now see two partitition on your harddrive (see picture)

    LeoInst

  9. Click on the second partition named “LeoInst”
  10. Click “Restore”
  11. As Source choose your Mac OS X Install DVD.dmg image (should be located on the desktop!)
  12. As destination drag and drop the second partition called “LeoInst”
  13. click “Restore”
  14. Wait about forever to have the DVD copied to your drive (again 15-20mins)

    diskutil01

  15. Close Disk Utility
  16. Go to “System Preferences” and choose “Startup Disk”
  17. Choose your Mac OS X Install DVD (which is in fact now a partition) as start volume
  18. reboot system and install Leopard

Additional notes

These instructions are intended to be applied to genuine Apple systems rather than HackMacs. In my case I used my MacBook Pro. Because of the different .kexts to be applied to HackMacs this guide will not work for those systems! Be warned!