So ten years are over. In order to use latest music production tools (Ableton 10, Reason 11 and Cubase 10) I had to upgrade my old hackintosh and set up a new one. Luckily the community and the technology has made so much progress in the meantime that lots of adaptations required to get a hackintosh to work in vanilla mode ten years ago are just not necessary anymore. For instance, nowadays UEFI has become standard on motherboards. Back then, you had to build a pseudo Apple EFI 1.x emulation on top of the BIOS. That has become a lot easier and me likey mucho.
Ok, so much for the history lessons, let’s make a long story short. After reading mainly here, here and there I set up my system with the following configuration (yes this article is a refreshed version of my older post over at TonyMacX86)…
1. Summary
1.1. Used Hardware
- Motherboard: Gigabyte GA-Z270-Gaming K3 (rev. 1.0)
- CPU: Intel Core i5-7600K (with CPU Cooler Noctua NH-U9S)
- RAM: 2x8GB Ballistix Sport LT BLS2C8G4D240FSCK @2400
- Harddrive: Samsung SSD 850 EVO 500GB
Graphics: Gigabyte GeForce 210 (PCIe)[removed as of 07/03/2019]- Graphics: Sapphire ATI Radeon RX580 (8GB) [installed as of 07/03/2019]
- Soundcard: RME AIO (PCIe)
- DSP Card: UAD Solo (PCIe)
1.2. What’s Working?
- USB:
allports working [configured properly as of 03/07/2019 see here] - SATA: all ports working
- Ethernet (Killer E2500 LAN chip): works
- PCIe Bus: all slots working (tested with GeForce 210, Saphire ATI Radeon, RME AIO and UAD)
- Sleep, Wake: works
(for GeForce 210 in Clover configurator provide: darkwake=1[darkwake is not required with Sapphire RX580]) - Graphics: Dual Heading works
(with GeForce 210, in Clover only provide: nvda_drv=1, that’s all! Don’t use web drivers or anything else!!![this is not required with Sapphire RX580]) Graphics: Internal Graphics Intel HD630 deactivated- Graphics: Internal Graphics Intel HD630 in BIOS activated, used as internal only [as of 07/03/2019]
- Hibernation: not tested yet
- HDMI Sound:
not tested yetworks - Audio: Realtek ALC1220 not installed (b/c of running RME AIO. To make ALC running ppl are coding tons of things since 10 yrs. Check here for details.)
2. Installation Process
2.1. UEFI BIOS Settings and Switches
- System (BIOS Version):
F8F9D [as of 07/31/2019 see here] - System (BIOS Date): 07/06/2017
- BIOS (Windows 7/10 Features): Other OS
- BIOS (Storage Boot Option Control): UEFI
- Peripherals (Initial Display Output): PCIe 1 Slot (or whatever slot you installed your graphics card into)
- Peripherals (Onboard LAN Controller): Enabled
- Peripherals (USB 3.0 DAC-UP 2): Normal
- Peripherals/USB Configuration (Legacy USB Support): Enabled
- Peripherals/USB Configuration (XHCI-Hand-Off): Enabled
- Peripherals/USB Configuration (USB Mass Storage Driver Support): Enabled
- Peripherals/SATA and RST Configuration (SATA Controllers): Enabled
- Peripherals/SATA and RST Configuration (SATA Mode Selection): AHCI
- Peripherals/SATA and RST Configuration (Aggressive LPM Support): Enabled
- Chipset (VT-d):
DisabledEnabled [as of 07/03/2019 see here] - Chipset (Internal Graphics):
DisabledEnabled for Intel QuickSync Purposes [as of 07/03/2019 see here] - Chipset (Audio Controller): Disabled (you may try to get this running, but it was just not needed by me)
- Power (Platform Power Management):
DisabledEnabled [as of 11/03/2018]
2.2. Installation
- For Sierra I originally created bootable pen drive with UniBeast (version 7.1.1), there are also versions for newer versions of MacOS
- Important: I used USB 3.0 for the pen drive (only the red USB 3.0 port on the back works during installation, otherwise take the USB 2.0 ports, but be prepared that the installation takes much longer using USB 2.0)
2.3 Post Installation To Dos
2.3.1. MultiBeast configuration (get it for Sierra, High Sierra and Mojave here)
The version numbers are likely outdated, as these were originally for MacOS Sierra.
- Quick Start: UEFI Boot Mode
- Drivers (Disk): Intel Generic AHCI SATA
- Drivers (Misc): FakeSMC v6.25-333-g05e0f4be.1759
- Drivers (Misc): FakeSMC Plugins v6.25-333-g05e0f4be.1759
- Drivers (Misc): FakeSMC HWMonitor Application v6.25-333-g05e0f4be.1759
- Drivers (Misc): NullCPUPowerManagement v.1.0.0d2
- Drivers (Network): AtherosE2200Ethernet v.2.2.1
Drivers (USB): Increase Max Port Limit 200 Series[only use this for installation purposes, not in a productive environment. Configure USB properly instead (read below at 3.3.)]- Bootloaders: Clover v2.4k r4173 UEFI Boot Mode
Customize (Graphics Configuration): Inject NVDIA (only!!!)- Customize (SSDT Options): (none)
- Customize (System Definitions): iMac 14,2 (you’ll change this in clover configurator to iMac 18,3 later on)
- then click ”’Build”’
2.3.2. Clover Configurator (Download here)
- Tools (Mount EFI): Mount the EFI Partition where MultiBeast installed your UEFI Clover boot loader into
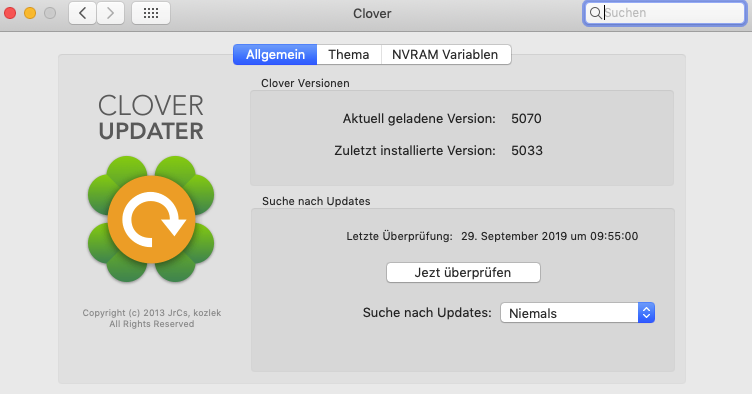
- You should consider updating Clover before moving on.
- Open: EFI (partition) -> EFI -> Clover -> config.plist
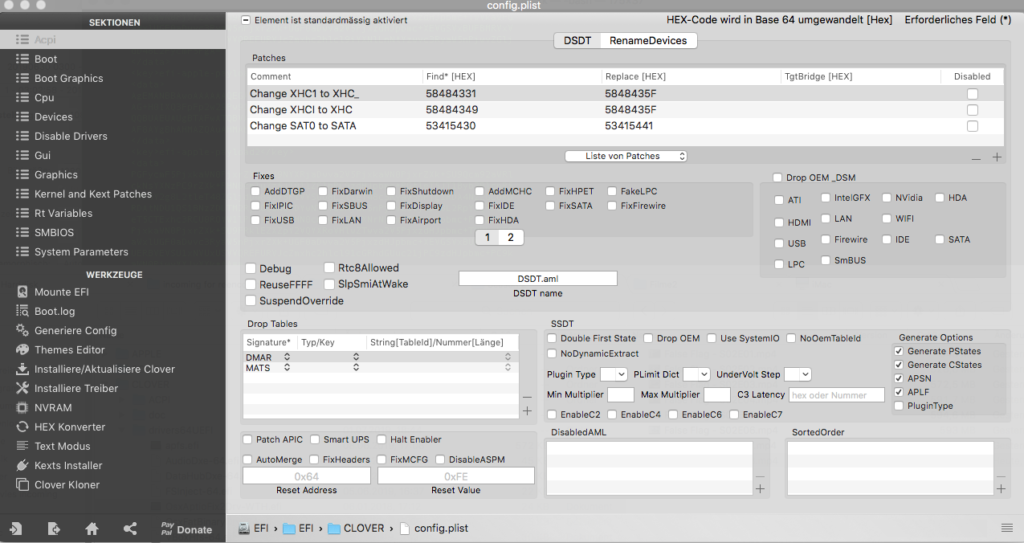
ACPI (Fixes): FixShutdown (needs to be enabled, otherwise shutdown too often just reboots) **new 03/11/2018 [removed as of 07/03/2019]- ACPI (Generate Options): Generate PStates, Generate States, APSN, APLF
Boot (Arguments): darkwake=1, dart=0, nvda_drv=1 [removed as of 07/03/2019] as it is not required with my ATI Sapphire Graphics- SMBIOS (Up/Down Arrows, on the right): select
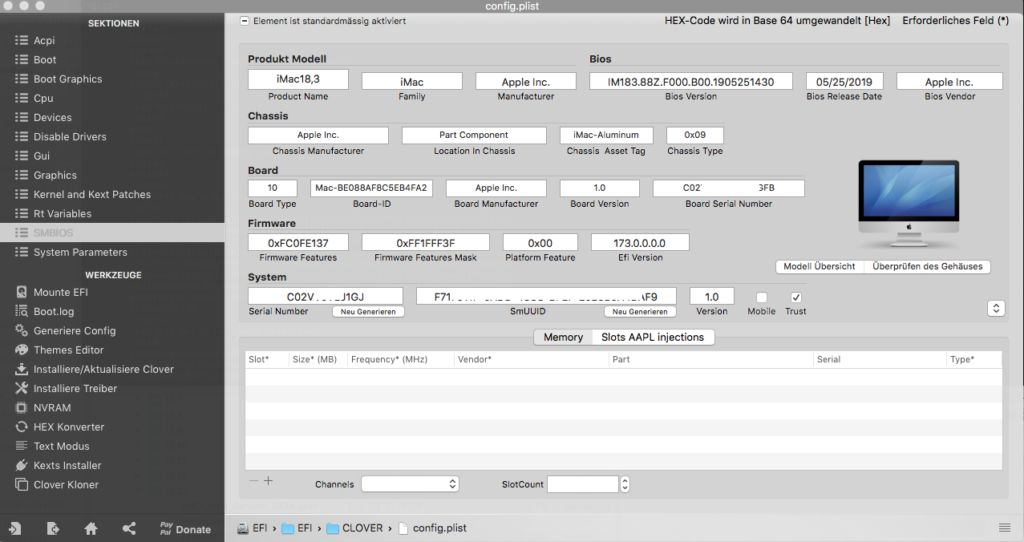
iMac 14,2iMac18,3 [with ATI Sapphire RX580 as of 07/03/2019] - SMBIOS (Serial Number): you may click “Generate New”, but imho it is far better to go here and create proper SMBIOS entries. Since this is important to get iCloud, iMessage etc. to work properly and to not get your Apple Account locked!).
- Save config.plist and reboot. System should be stable for now. But remember not to use iMessage, iCloud or anything iApple yet as long as you don’t have proper SMBIOS and UUID entries!
2.3. Addendum
If you decide to use that crappy “Migration Assistant” for migrating a Chameleon/Chimera based Hackintosh to a Clover based system, get ready for tons of issues and a non booting system (even if it was running perfectly ten seconds ago).
What does “Migration Assistant” do to our systems what we even remotely don’t need:
- it moves the deprecated “/Extra” folder with all its contents to the Clover based system, which screws up your system, because (at least older versions of) Clover try to use what is found in “/Extra” (you’ll see after reboot). Unless you don’t have a fallback installation to repair your main installation you would be done here. Neither Safe mode nor single user mode can be booted…
- it moves tons of outdated kexts to the “/System/Library/Extensions” folder. So even if you need them, you’d better move them to “/Library/Extensions” (which is the right place for all third party kernel extensions). So I wish you much fun, going fishing for kexts to remove. As said: I hope you have a fallback installation of the very same system to compare the contents of the folders.
- it moves the “/Library/Audio” with all its entirely outdated plugins to your new system without asking, thus making your DAW unstable
Never ever use that Migration Assistant. Just don’t!!!
3. Further Configurations
3.1. Make iCloud, iTunes, iMessage Work
When trying to make iCloud working, at least I had to learn, that iCloud, iMessage require a properly working NVRAM and valid SMBIOS entries, which were not the case on my system. iCloud allowed me to ask for 2 factor auth, but eventually didn’t login on the hackintosh. After several unsuccessful attempts, Apple eventually locked up my account for 12 hours. Don’t say, I didn’t warn you…
3.1.2. NVRAM EFI driver
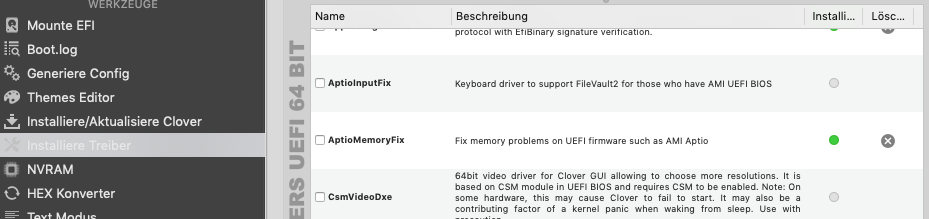
After reading here and there I found an NVRAM driver on this German forum: https://www.hackintosh-forum.de/forum/thread/35351-funktionierender-nvram-nun-mit-clover/ (by vit9696 and Download-Fritz). I don’t have any clue why this driver is called OsxAptioFix2Drv-WTH.efi but it worked.
In the meantime I found out that Clover Configurator provides us with the latest drivers that work: you gotta choose AptioMemoryFix.
3.1.3. Proper SMBIOS definitions
I had to rework the SMBIOS definitions. This article helped a lot: https://www.tonymacx86.com/threads/guide-how-to-configure-your-systems-smbios-correctly.198155/ and I cannot recommend it too much. Read, understand and repeat.
As you can see I use iMac18,3 as product name. This is due to the fact that I switched the graphics to ATI Sapphire RX580.
3.2. Enable Hardware Virtualization Support (Intel VT-X)
Since most of us will need a Windows version for certain tasks from time to time, it makes perfectly sense to prepare the system for virtualization. Intel provides a hypervisor-technology named Intel-VX, which is especially helpful for virtualizing 64bit versions of operating system. As far as I understood (no warranty here), it is not required for running 32bit versions of operating systems, but please check this for yourself.
In order to re-enable VT-X on this board’s UEFI settings, I added DMAR signature to DROP TABLES in clover configurator. Found here: https://www.tonymacx86.com/threads/how-to-fix-the-vtd-0-fault-error-vt-x-working.232113/

3.3. USB Configuration for stability
I had to learn, that port patches that increase the amount of available USB-ports to more than 15 are not recommended. System stability is at stake then. For getting USB stable and close to vanilla I followed this approach: https://www.tonymacx86.com/threads/a-beginners-guide-to-creating-a-custom-usb-ssdt.272505/
Some minor DSDT patches must be applied (see picture: XHC1 to XHC and XHCI to XHC and see SSDT-USB.aml in the attachment and some ports have to be removed that are just not allowed to work in order to fulfil Apple’s USB-Port limit of 15: uia_exclude=HS05;HS06;HS09;HS10;SS05;SS06;USR1;USR2 see picture).


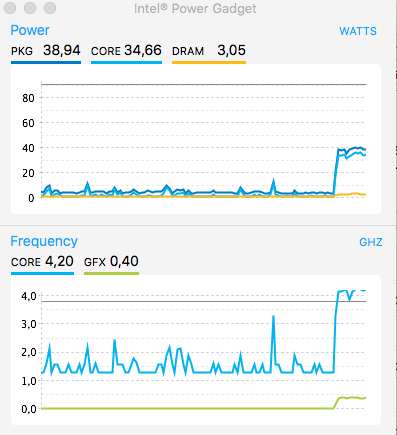
3.4. Intel SpeedStep (CPU Config)
Works sufficient, but I could not manage to get the CPU down to 800MHz, so I decided to stay with Clover Generate Options: Generate PStates, Generate CStates, APSN, APLF. (see picture). I removed NullCPUPowerManagement.kext from the EFI kexts folder.
3.5. Graphics
In the meantime I upgraded to High Sierra (Vanilla Apple Software Update) and then to Mojave (Vanilla Apple Software Update). I replaced the nVidia with the Sapphire ATI Radeon RX580. Together with LILU and Whatevergreen, everything works perfectly, as long as I plug the screens to the Sapphire card. I turned on the internal Intel HD630 in the BIOS for video encoding and decoding purposes (see Intel Power Gadget picture).
4. Possible Issues
4.1. Thermic and Temperatur Issues (CPU)
While monitoring the temperature of my CPU, I found out, that it went up to 85degrees celsius while making music. I originally used a Zalman cooler. It obviously did not fit my demands. After replacing it with the Noctua NH-U9S, the temperature is now peeking only up to 62degrees celsius.
4.2. In Case of Random Freezes and Random Crashes
After having had a lot of those random freezes/crashes (with mouse ball spinning, sound distortion, completely unresponsive and so on, no usable kernel messages in log) I almost tried everything (creating rock solid SMBIOS definitions allowing for iCloud & iMessage; configuring USB properly; installing new NVme, AMD GX580, unplugging all SATA-drives).
It often occurred while watching sth. on Youtube, listening to NAS streamed music in iTunes or while making music on my own (Ableton Live / Cubase / Reason). It occurred no matter if I used WhatEverGreen or configured the GFX manually. It also had no impact if I chose to enable the internal Intel HD630 or not.
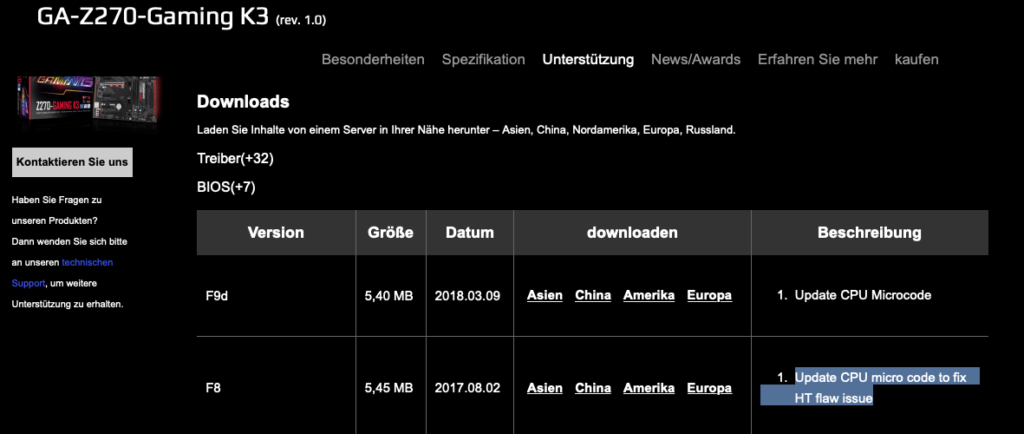
It looks like, that eventually I solved this issue by updating the BIOS. Newer BIOS revisions contain Intel Microcode Updates…
More background information about the Hyper-Threading flaw (HT-Flaw) in Intel CPUs can be found here: https://www.tweaktown.com/news/58168/major-flaw-found-intel-cpus-ht-needs-bios-fix/index.html
4.2.1. Links to random freeze issues
- https://www.tonymacx86.com/threads/high-sierra-random-freezing.243150/
- https://www.insanelymac.com/forum/topic/334731-my-hackintosh-stil-freeze-from-high-sierra-to-mojave/?do=findComment&comment=2646743 (This guy upgraded the CPU, which brought me on the right track, that I might indeed could have suffering from the Intel hyper-threading bug, aswell)
// edit 08/09/2019
// Now running the system for more than 6wks absolutely stable, that means…
// the thesis of having had microcode issues before upgrading the BIOS firmware is confirmed.
// edit 21/10/2019
// System still running rock solid. Catalina on 2nd hard drive for testing purposes already works stable
4.3. Dual Booting MacOS and Windows (using NVMe-SSD and SATA-SSD)
I had to learn when using an NVMe SSD on the PCIe Bus and an SSD on the SATA Bus, the Gigabyte Board always tries first to start operating systems which are attached to the SATA Bus. Take this into consideration when wondering why your changes to the EFI-Clover folders are not being applied after rebooting!!!
5. Downloads (09th Nov. 2019)
These configs work with Clover version 5070. You only have to edit your system configuration and consider that not all of the motherboard’s USB-ports are gonna work (read above about Apple’s USB port limit).